We are big on crafting around here. I love creating, and I have passed that love along to my own little ones. This afternoon, while the boys were resting and Madeline was busy, I did some creating all on my own. And it was lovely! I found a picture of this pebble art idea on Etsy, and that talented artist was selling her creations. I thought I would give it a whirl on my own – and I was so happy with the results. This art project could easily be done by little ones, and my kids have already played around with some pebble art ideas.
I opted to do it on my own this first time, as I knew I would have to play around with different kinds of glue and natural material. I have found it best, when I have something in particular in mind that I do it on my own at first. That way I have a chance to figure things out and fulfill my own curiosities, making me more open to letting my little ones create as they choose.
Creating pebble art is amazingly simple. And amazingly fun.
To begin with, go on a hunt for some smooth, flat rocks. The trick is to find rocks that are quite thin and don’t have too many lumps or bumps. The beach would be ideal, but we just used our road outside. We also found some twigs and tiny pine cones, just in case. My kids did this part with me, no questions asked. “Let’s go outside and find some rocks” — shoes on, door swings shut before I finish my sentence.
Next, I washed up the rocks. I just used a damp cloth to remove and visible dirt and let them air dry.
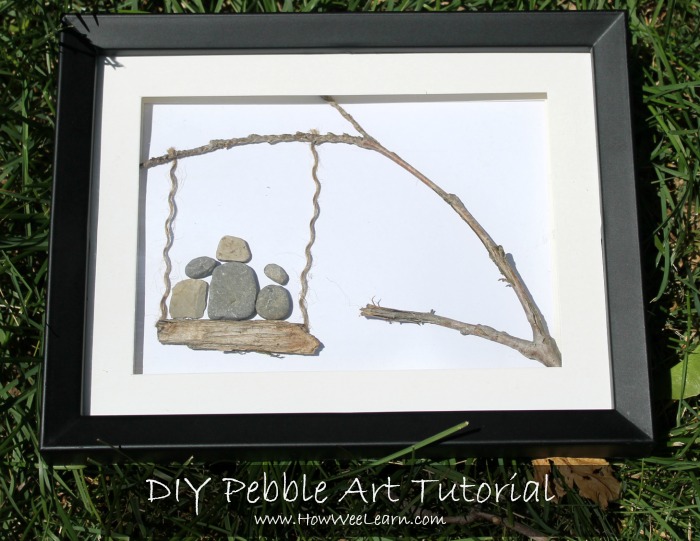
After, I played with some different picture ideas. I tried mimicking the one I had found on Etsy, played with a bonfire idea, and settled on a sweet tree swing picture, with my three little ones swinging under the shade of a tree. This was a pretty easy decision as we are anxiously awaiting a move into our country dream home, and one of the things my kids have been most looking forward to is building a big tree swing.
Once I settled on a scene, I dug up a frame. I had originally purchased this one from the dollar store – it is not an actual shadow box frame, but has a bit of depth from the glass to the backing – about 3 centimeters, which was plenty.
I removed the back of the frame and cut a border that was the same size as the border on the picture. I taped this on to the backing. This way I could tell how much of my scene would be visible from the frame.

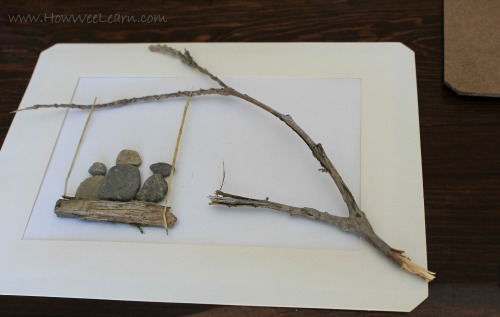
After, I set the scene up on the backing until I was happy with it.
I then experimented with some different kinds of glue. Hot glue worked, but I didn’t think it would hold up well after some time passed. Gorilla glue worked, but I had trouble keeping the glue from showing since it puffed out so much. I found that super glue worked the best, it just required a bit of patience. I had to hold each item down for about 15 seconds or so before moving on.
I began by gluing the stick on as the tree. This was the trickiest one to glue down surprisingly, but it did work with the super glue it just needed some extra time being held. I added glue and held it down for about a minute.
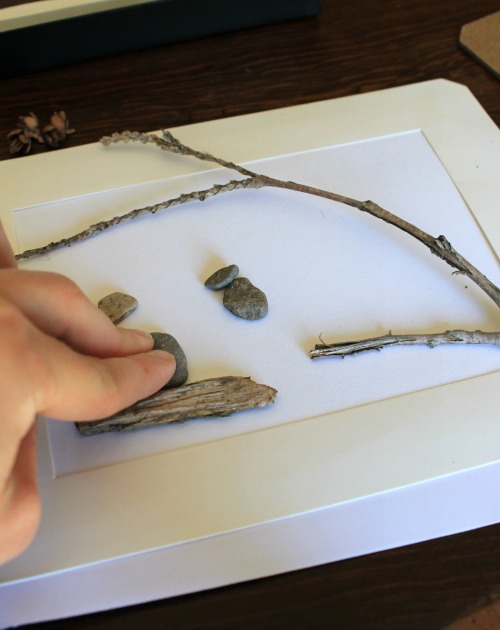
I then glued on the piece of bark as the swing and each little pebble for my babes bodies and heads. I opted to keep it very simple with just heads and bodies, though I may play with arms when we create more pebble art later on. I took my time positioning the stones for the bodies and head, I wanted to create a feeling of closeness and love on the swing, and I think I managed by carefully looking at the angles of the rock and trying to get a scene of heads resting and gazing.
I ended up using some twine (unwound so it was only one thread) as the swing ropes. I had tried to use hay, but I couldn’t get it to stick. The twine was tricky to stick on, but it did stick eventually.

Once it was all dry I put it in the frame – and I am so happy with how it looks! This sweet picture, which holds oodles of meaning to me, cost a grand total of $2. $1 for the frame, and $1 for the super glue.
I love making my house look nice, and I love doing it myself. This pebble art project was tons of fun, and turned out great. I am eager to create more works of art with my little ones. They will be able to do it all on their own, I will just do the gluing when they are done creating their scenes.
Please consider liking us on Facebook for more creative art projects! Thank you!


You did a great job – it’s turned out brilliantly!
Thanks for sharing at #Pintorials 🙂
Thank you for the invitation to share!
Hi Sarah
My rand child is 5. We have a week long vacation booked at the beach. I’d love to do pebble art with her but am worried about the use of super glue. How did you get around that with your children
Thanks
Sandra
Hi Sandra, thanks for your question! For my littlest ones, I had them place the stones on the paper and spend time getting their picture just right. Once they were happy with it, I did the gluing myself. I hope you have a blast!
Elmers glue works just fine but will take some time to dry.
Great – thanks for following up!
Let her use Elmer’s glue and explain she has to wait for it to dry before moving it
I bought some pebble art at a market a couple of years ago. You have inspired me to head to the beach, get some pebbles and be creative. Thanks.
Hi!
A lovely way to spend the afternoon with the kids!
I’m happy to have been able to inspire you.
All the best
Sharon Nowlan
Pictou, Nova Scotia
Your art is absolutely gorgeous Sharon. Thank you for visiting! Please feel free to leave a more direct link to your site if there is one!
I do mosaic art as a hobby and want to start doing it as a part time or full time business. The problem is that good mosaic art, at least for me takes a long time and I can’t price it enough to pay even a little for my time. pebble art seems perfect is perfect for me.
I use Wellbond for mosaics as the glue. would that be good for pebble art or is it not strong enough to hold the pebbles. Any advice from anyone would be appreciated.
what did you use for a frame backing to glue the rocks on to?
Hi Karen, Thanks for reading! I glued some cardstock (which is a thick paper, though any paper would work) to the cardboard backing that came with my frame. Once it was dry, I glued on the stones. Are you going to give it a try? If so, I would love to see it when your done!
I am Sarah but I was having trouble with the backing. Did you use card stock to make the border as well. Thanks.
Hi Karen. The border actually came with my frame … But you could definitely use card stock. Is the trouble with adhesion? The type of glue is quite important I found …
Hi Sarah,
I’m doing a similar project, although I’m using sea glass instead of pebbles. I used blank index cards as a backing and when I tried to glue the glass to the paper the super glue soaked into the paper and changed the color from white to grey. Is card stock different? Will it prevent the glue from soaking in?
Thanks
Hi Craig, I am not too sure about index cards off hand, but cardstock is a bit shiny on one side so perhaps that is the difference? Would love to see your finished project when you are done.
Hi – What kind of super glue did you use?
Hi Meredith! We actually just used super glue from the dollar store – I am not sure of the brand. Any kind should work though! Have fun!
where do you find such reasonably priced frames that are deep enough for pebble art?
Hi Sue, our local Dollar store (Dollarama) carries them. Thank you for reading!
I wanted to thank you for sharing this with all of us. I am so excited to start doing this. After I saw your blog, your project and also the work of Mrs. Nowlan, I immediately went to the beach yesterday after work and collected many pebbles. I have always loved rocks and pebbles since I was a child and this is a perfect way to work with them again and create some pieces from it. Thank you, thank you!! I have already structured some scenes already on part of my barstool counter top area at home. Once I get the cardstock and frames, I will be good to go. I will make sure to come back and share my creations with you. Once I get a blog going, I will link your site for anyone who wants to get started. Thank you again!!!!!
So wonderful that you have been inspired Bridgette! I am sure your creation will be lovely. Thank you for sharing!
Love the natural look. I just started tumbling rocks this year and have produced some beauties, now looking for art projects, this was helpful to see. Plain pebbles for outside swing, could use polished ones for a fancier swing I think, we will see. Thanks for sharing your wonderful ideas
diane
There are so many gorgeous ways to use pebbles – you will make some beautiful works of art I’m sure. I would love to see a picture when you finish one! howweelearn@gmail.com
I am going to give it a try! Thanks for sharing!
Hi Sarah, thanks for the blog..one doubt am having ..whether you removed the glass that came along with photo frame, or u just attached above the pebbleart …because am not able to get shadow box frames at reasonable cost…
Hi Dharani, I am in Canada, but our local Dollarstore carries photo box frames for $2-3. Perhaps you could check your dollarstore? Otherwise, removing the glass from any frame would work as well. Sorry you are having trouble finding a frame!
I made the feet ( dad mum and baby) also the box frame for my nephews christening. Looked great and I used cleat wood glue PVA.
I actually have been loving these as I had so many beach rocks that my grandkids had collected. I have been experimenting and have come up with using 8 x 10 canvas boards and using hot glue gun to attach the rocks to the boards. I have painted scenes on the back attached the rocks and now I can place in 8 x 10 frames. I did find these boards in a discount store 6 for $5.00. You can paint the canvas – you have the cardboard backing – and can place in frames.
Great idea – thanks for sharing Arolyn.
Hi, love your work! Just wanted to mention one thing about glue. I worked as an arrowsmith for twenty years and used alot of types of glue. Super glue is good to a point. The drawback with it is over time. Super glue becomes brittle and tends to crack as it ages. Im afraid that you may have to reglue your project at sometime in the future. Maybe take a picture and stick it in the back of the frame for a just in case kind of guide to recreate it if need be. (I really hope like crazy that day never comes!)
A possible type of glue you might give a try is two part epoxy. This glue (even after years) maintains a certain amount of softness. Not that it will give way. Just that it doesnt become brittle as the super glue does. The best epoxy for most jobs, is a long curing type. You can get 24 hr. Epoxy. They also have 5 minute, and various cure times in between. The longer it cures, the more stable it is.
If you have never used two part epoxy, it does dry fairly fast. You will need to get your layout done before mixing up the glue. That way you can get more glued down while the glue is more liquid. As it drys it becomes sticky and stringy. You can still apply it like that, but you will be wearing some on your fingers. After applying your pebbles, etc… You should put it in an area that it wont be disturbed until the cure time on your packaging has past. My favorite epoxy is made by loc-tite. I usually get the 24 hour cure, however ive also gotten a 6 hour cure and was happy with it.
Hope this helps out someone.
To me, the most beautiful art is nature and nature inspired! Sharing it all with the little ones makes it even more meaningful. May your days be filled with wonder and amazement : )
Im sorry! Forgot to add that the epoxy once mixed up, will stay usable for about 5 minutes. A rule of thumb i use is, make 2 dime size puddles. This allows you to use up the glue while its still liquid and you wont waste as much. Use a coated type of paper to mix on (like a piece of a cereal box). This way the glue will not soak into the paper. Each time you mix a new batch up, put the new stuff on a clear spot on your paper. If you “double stack” and mix the new on the old, the glue will react to the old batch and dry even faster.
The epoxy in the syringe is very simple to use due to both the resin and hardener being put out at the same time.
****TIP**** before using your epoxy syringe the first time, take the caps off both sides, hold the syringe straight up in the air, and push the two sides up evenly. Keep going until all the air is out and you have evened up the amounts in both sides. It usually happens that there is far more stuff in one side than the other. Disguard the overage because you wont have equal amounts of resin and hardener. If the same amounts of each arent used, it will never dry. Once you get the sides evened up, usually it doesnt need to be done again. Just be sure to apply even, slow pressure on the syringe so you can remain in control of your amounts.
Also, epoxy drys because of a chemical reaction between the resin and hardener. So if you need a fan on while you work for comfort, you need not worry about messing up the glue.
Thank you for all this information Willow. So very helpful.
I am just starting my journey in pebble art and am loving it. After the picture is completed in the shadow box type frame, do you place glass over it or just leave it open?
I am so happy you are loving it! I purchase the frames that have glass and I do use it, but there is no real need. I suppose it is personal preference. Thanks for reading!
So cute <3
Would silicone work as an adhesive?
Hmmm – I’m not sure? Maybe someone else will know?
Hi, y’all. I’m really late to this whole conversation, but I do know a bit about this. I am a retired Special Ed. teacher, and worked for a long time with older HS kids, with severe levels of disability. Part of their work was Vocational, and I made jobs for them based on what tinier needs were — sorting, assembling, packaging…etc.
Some of my kids had some *phenomenal” strength, and could break everything! Hot glue? Bah!! Epoxy?? Hehe! But what did hold up was a silicone caulk that, once dried, even the most, um, ‘industrious’ of my angels couldn’t break through!
At that time, I couldn’t find it in stores, and could only buy at the Perkins School for the Blind as part of their Daily Calendar Skills product line. I did find it later at Lowe’s Hardware, and I’m sure it’s available in most hardware stores, and it’s a tube, like other caulks, and it’s simply white, plumbers’ Silicone Caulk. A small pea sized dot will hold an incredible amount of stress after it’s dried. It’s not toxic, but of course common sense usage around kids is always key.
This works quite well with other art projects, too-I’ve used in on mosaics, and other things. I hope this helps in some way.
Thank you so much for this great suggestion!
Where can you buy ( pebble flat stones) would love to try this pebble art! Would craft stores as Hobby Lobby sell them? Ths
Hi Sandy. Thank you for your comment – I am glad you are excited to try this art! We are lucky enough to have these pebbles everywhere around us, but I know they are also available on Amazon (aff) http://amzn.to/2dnVjxe and likely at crafts stores too. Have fun!
Does krazy liquid super glue work? I am just starting a business doing pebble art and can’t figure out what glue to use.
Do you Polish the rocks
Hi there, no we didn’t polish them.
Hi Sarah can you please tell where to find online shop selling shadow box frame as you mentioned in the text. I will share my work when the time comes. Thank you.
Hi there, believe it or not we just got ours at the Dollar store! There are many options online though. Here is one just like the one we used through Amazon (this is my affiliate link) http://amzn.to/2EOV7XU Would love to see your completed project!
I have made ten pebble portraits only to find the glass does not fit over the pebbles , shadow boxes from dollar store do not hold picture and the glass, any suggestions?
Hi Michelle, That’s disappointing! Perhaps you could try to use thinner pebbles? Or purchase a deeper shadow box from Amazon (I left my suggestions in a comment above)? I hope you can get it to work!
Walmart has wood panels for five dollars. Use the shadow box side of the panel. I use E6000 glue to hold the pebbles.
Thank you for your reply I appreciate it. For my first one of bunnies I glued the glass over top of the frame then used buttons to hide the glue on the four corners. Turned out good. I am making a man fishing for dad and a girl walking a dog ( me ) and the lay out is perfect now going to figure out how to use the shadow box I have. Then going to check Walmart for shadow boxes that are deeper then dollar store ones. I do not have face book just email , I would love to send you pictures when they are complete, if you’d like?
Thanks for the tips. I love your rock art.
Thank you Sheere!
Do the frame’s have Glass ?
Hi Chris, yes they do – we purchased shadow box frames.
You can buy shadow boxes from Micheals, eight for 25.00.
Thank you Charlene – great tip
Please could you advise me whether to use paper or card to glue the pebbles on as I an a complete beginner
Hi Elizabeth – cardstock or cardboard is best as it is much sturdier for those pebbles. Have fun!
Hi, I love your picture and very clear instructions! I’ve been wanting to try this for a long time and have decided to give it a go after reading your article.
One question, do you sterilise the wood bits at all? Do you think it would need this step? (Thinking of any bugs that may live in the wood!!)
Really great question Pat. I would suggest popping them in the oven on a very low heat for an hour or so, just to cook out that possibility! Have fun creating!