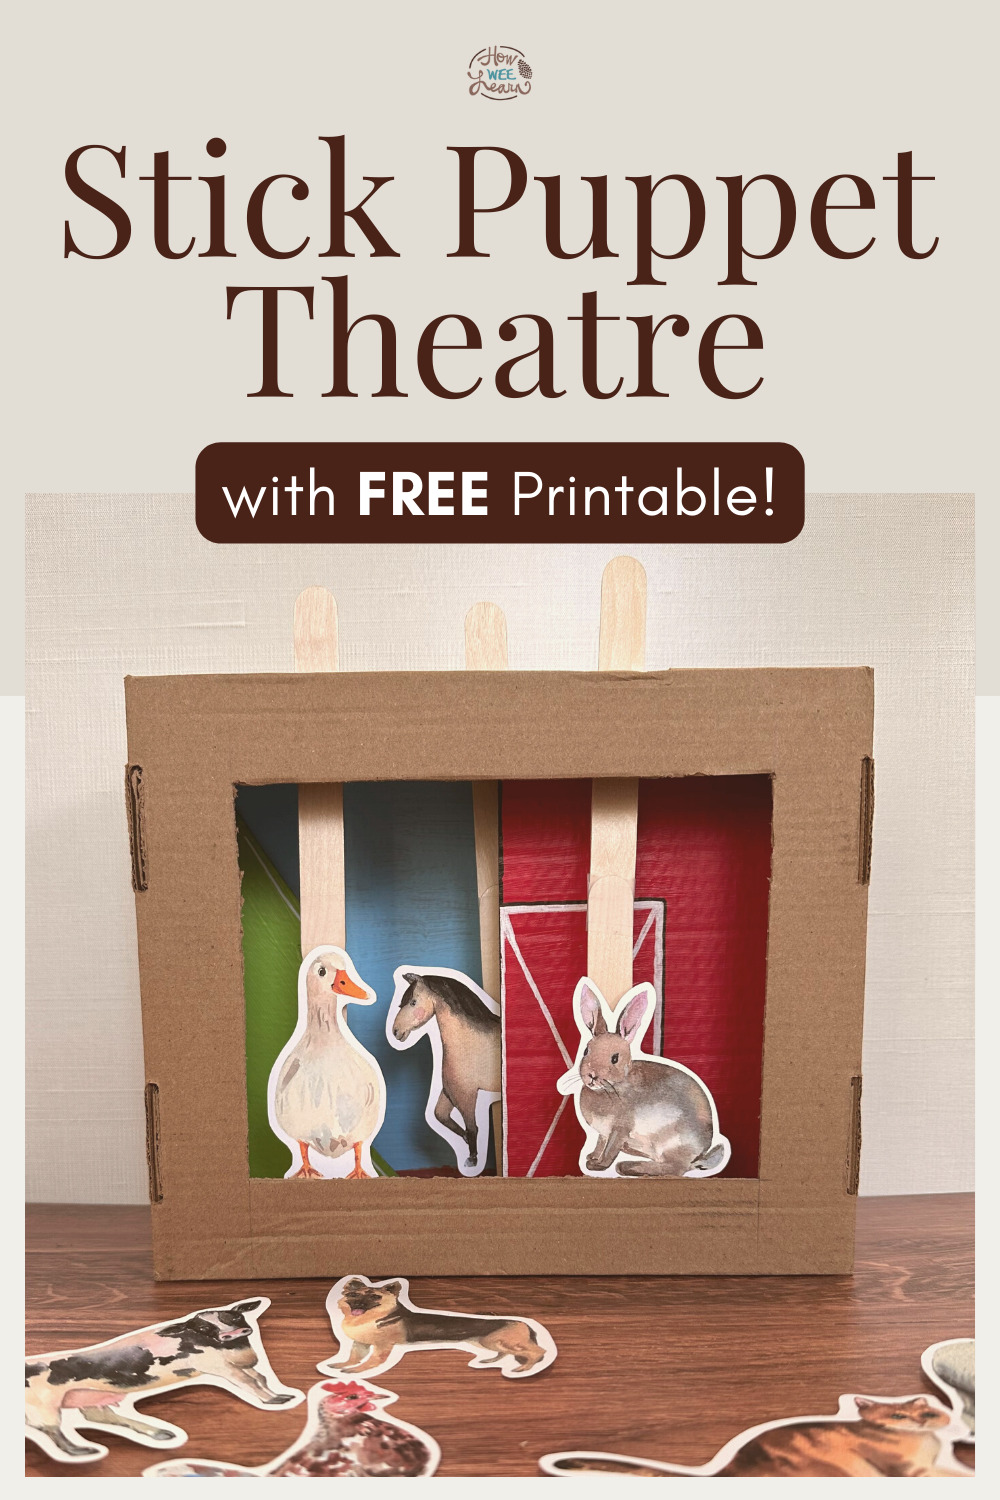
A puppet theatre is such a fun way to bring stories and playtime to life! With just a few simple supplies—a shoebox, popsicle sticks, and my Farm Animal Stick Puppets Printable—you can make your own DIY puppet theatre that is sure to be a hit with the kids.
I’ll show you how we created ours below, and what I might do differently if we were to make another one (and honestly, this one was so much fun to put together, I can see us making many more with different themes!).
But first, grab your FREE Farm Animal Stick Puppets Printable right here:
This printable is part of my Playful Days Toddler Program. It includes one beautiful, simple craft or activity to enjoy with your toddler each and every day. You can take a peek right here: https://shop.howweelearn.com/pages/playful-days
 |
 |
 |
Making Your Stick Puppet Theatre
For this project, you will need:
- A shoebox (or cardboard box around the same size)
- Pencil
- Ruler
- Xacto knife
- Scissors
- Paint and paintbrush (optional)
- Farm Animal Puppet Printable
- Popsicle sticks or skewers
- Tape
Alright, let’s dive right in! Here’s how to make your very own farm animal stick puppet theatre:
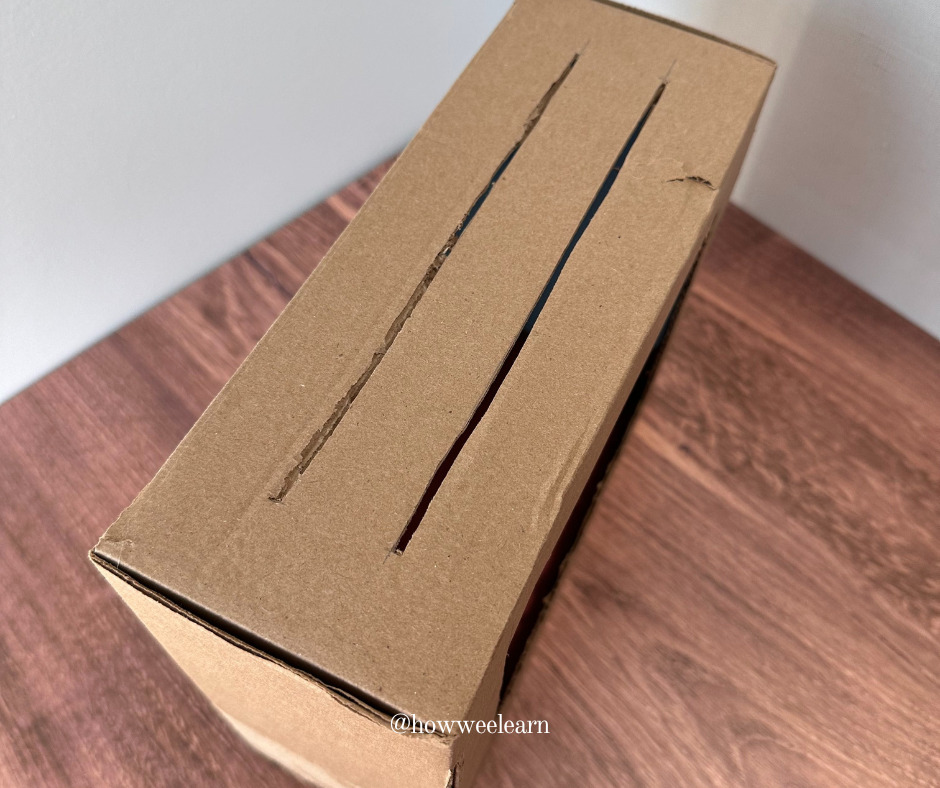
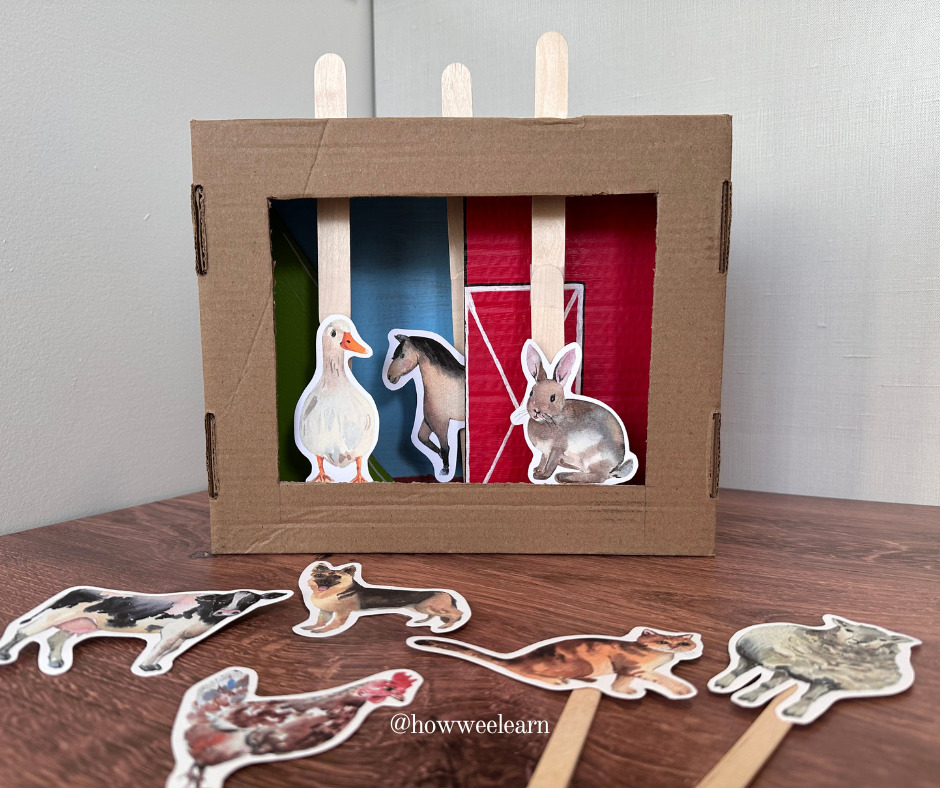
1. Cut two slits along the top of the box.
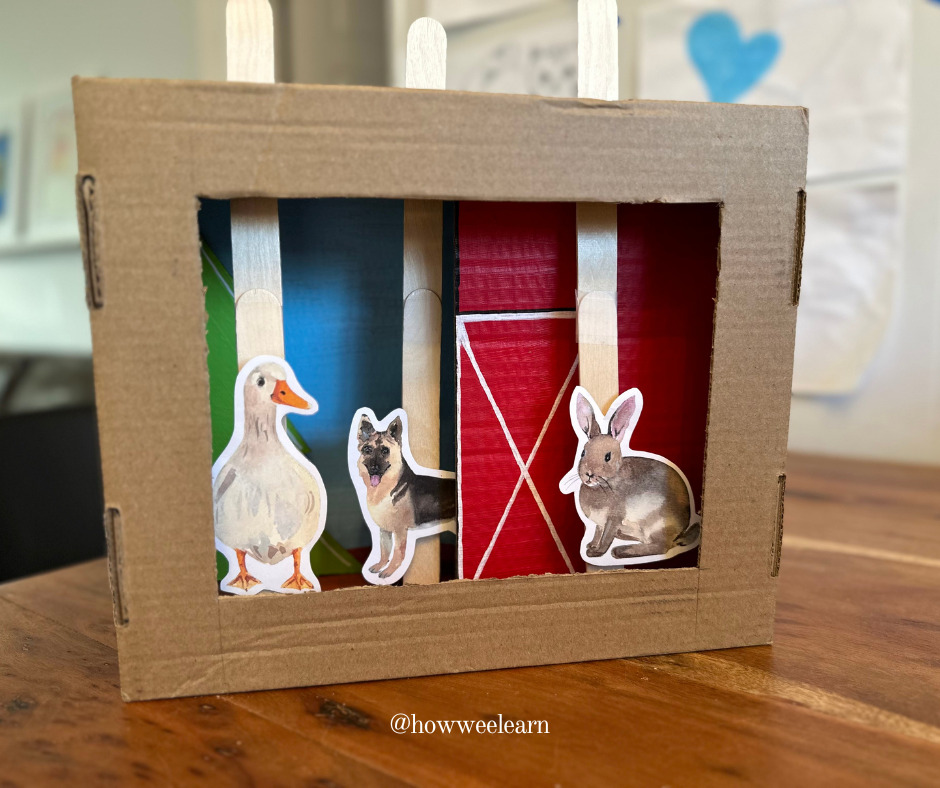
I used a ruler to draw two lines on the top of the box, around an inch and a half apart. Then I carefully cut down those lines with an Xacto knife, then cut them again to make the slits just wide enough to fit the popsicle sticks. These will act as “tracks” for your animal puppets to move along.

I kept the slits quite narrow so we could position the puppets and they would stay standing up, but you could make your openings wider or cut a single large opening on the top of the box. With one big opening, your little one would be able to move the animal puppets around freely in their puppet theatre.
2. Cut a large opening in the front of the box.
If you’re using a shoebox with a removable lid, you could just leave the lid off and make that opening the front of your theatre. Done!
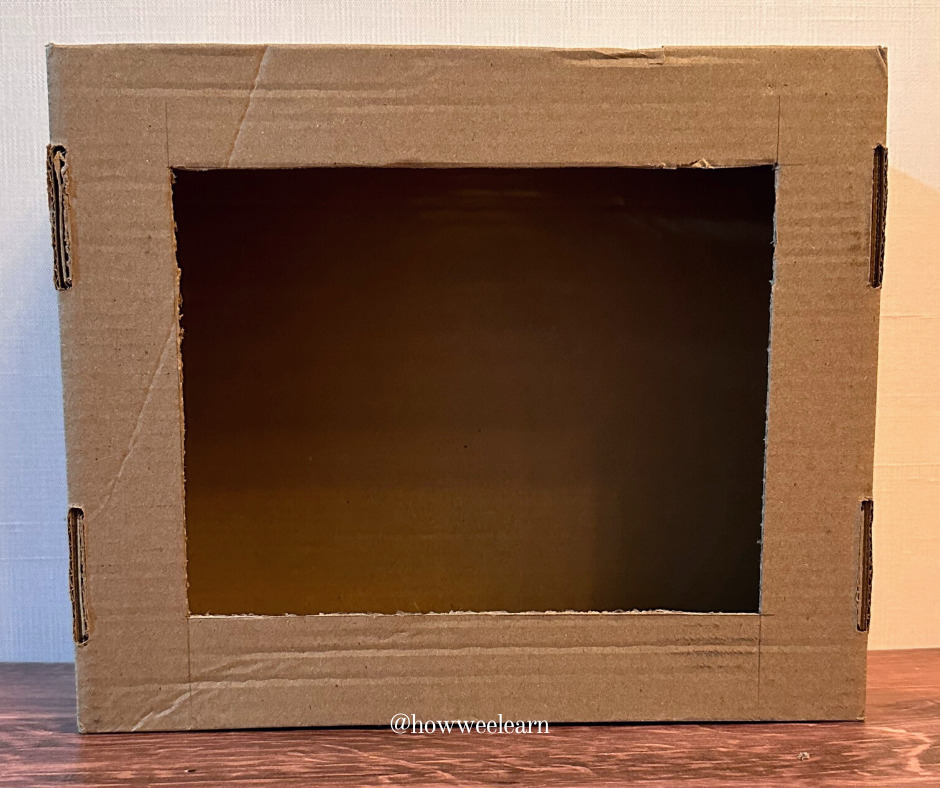
I ended up cutting the opening on the back of the box (using the Xacto knife again). I’m not exactly sure why I thought that was a good idea, making the opening on the back of the box… but it did work out quite nicely when we painted the backdrop!
Which brings me to the next step…
3. Paint your puppet theatre!
Since we’ll be using this puppet theatre with farm animal puppets, we decided to go with a farm look. That part of my plan was logical, at least! Since I cut our opening in the back of the box instead of the front, we were able to “open” the back to paint the sky and a muddy ground.
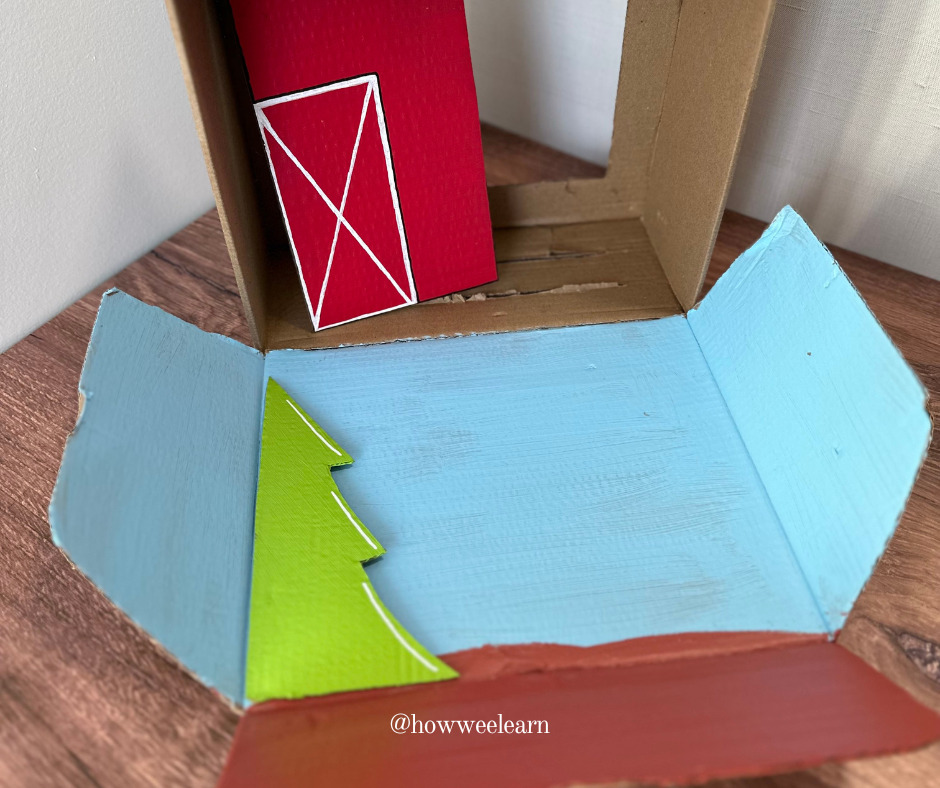
We decided to leave the rest of the box natural, mostly because a certain someone was too eager to start assembling the stick puppets and get playing. Me… it was me that was too eager… But your little one could have lots of fun painting and decorating their puppet theatre however they would like for as long as they would like!
A word of caution: Our backdrop started to curl a bit from the paint (especially along the part that had a generous helping of brown, muddy paint). So, if you use paint, keep those paint layers on the thinner side.
If I were to do this activity again, I would use our paint sticks. They work wonderfully on cardboard, and we wouldn’t have to worry about using too much and having the cardboard curl. We also wouldn’t have to wait for the paint to dry, win-win!
4. Optional: Make some accessories.
This part is totally optional, but lots of fun!
We cut a rectangle from some scrap cardboard so it would fit snugly on one side of the box and painted it red to be a barn. We secured it with a bit of painter’s tape between the two tracks so the “back track” of animals could look like they were going in and out of the barn, and the “front track” could move in front of the barn. We also made a little tree from scrap cardboard, painted it green, and used a loop of tape to attach it to the back of the box.
You could be as simple or elaborate with decorating your puppet theatre as want to be. Some little curtains to pull back like a real theatre stage would be absolutely adorable!
You could also string a little set of fairy lights in the box. We did this for a cardboard box doll house once, and it was epic! I was probably more excited about adding those little lights than my daughter was at the time, but boy did it ever look incredible. I had always dreamed of having a doll house with functional lights… and it was just as beautiful as I had hoped it would be…
I’m getting off track here. Back to the barn!
When you’re done building your puppet theatre, it’s time to assemble your puppets.
Assembling Your Farm Animal Stick Puppets
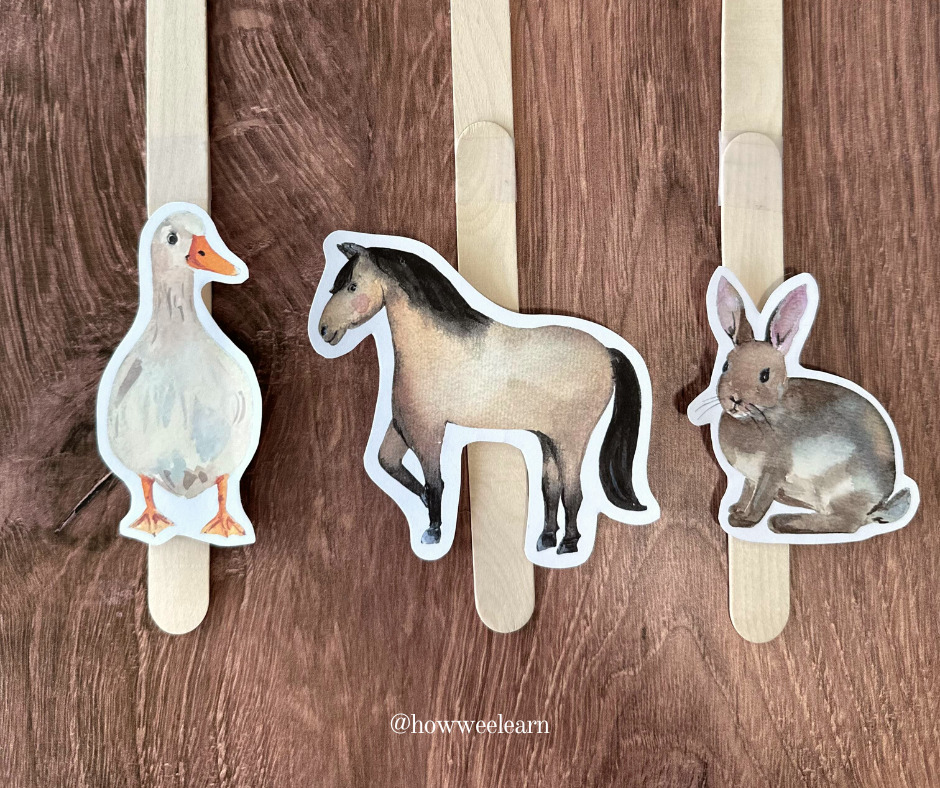
To assemble your farm animal stick puppets, simply print the stick puppet printable (I suggest printing on cardstock or gluing your animals to a piece of cardboard to make them sturdier), cut them out, then glue or tape them to a popsicle stick. Easy peasy!
Since we wanted to be able to position the puppets in little scenes, we attached two popsicle sticks with a bit of tape so they would reach right to the bottom of the box. Long skewers would also work wonderfully!
Finally, we stuck our farm animals to the popsicle sticks about an inch from the bottom so they wouldn’t be hidden behind the front opening frame.
If you secure the animals with a bit of painter’s tape, you can easily move and reposition the popsicle sticks as needed (in case you want to use them for one of the other fun activities we get into below).
But… depending on how enthusiastically your little one plays with their puppets, you might need something a bit more permanent!
And there you have it. Your very own stick puppet theatre is ready for play! Or should I say, ready for the play… because it’s a theatre… where you put on plays?
Other Ways to Play with Your Farm Animal Stick Puppets
There are so many fun ways your little one can play with these farm animal stick puppets! In addition to a stick puppet theater, you could also try:
Shadow Puppets
Tape a flashlight to a table in a dim room pointing towards a wall. Have your child hold the puppets up in front of the wall, creating shadows! Quite naturally, she will begin playing with the cool concepts of light and shadows.
Small World Play
Cut out some egg carton cups and add a slit to the bottom of each one using a knife. Turn these cups upside down so your toddler can press the popsicle stick through the slit and have their little animals stand all on their own. You can add a few squares on your kitchen floor using painter’s tape to be houses or pens for the various animals and watch as your toddler’s imagination takes over and he enters a magical world all his own!
Picture Book Puppet Match
Have your toddler hold these puppets as you explore some of your favourite picture books together. Hunt through those books, looking for animals that match your puppets. If you spy a cat on one of the pages of your book, have your toddler find the cat puppet and hold it up, or even use it as a bookmark to keep track of which animals you have found.
Puppet Silhouette Puzzle
Trace the puppet shapes on a piece of paper and have your little one try to match each animal with its outline.
Simple Puppet Puzzle
You could also snip the animals into two (or three, or four!) pieces, then mix a few of them together and have your little one sort out the animal pieces and put them back together.
Whew… that’s a lot of play and learning with one printable. I hope you and your little one absolutely love your stick puppets printable and theatre!
xo
Sarah
You will find activities like this and so much more in my Playful Days Toddler Program.
Take a peek at Playful Days right here:
https://shop.howweelearn.com/pages/playful-days
|
|
|

Love these Ideas! I had these animals printed for this months Playful Days & was thinking about more ways to play so this was GREAT timing! Now we have our theater ready for Puppet Play in a few days! I think we will try the shadow idea at some point too!
Love this Kaitlyn! So fun!! Thank you for sharing!
Where is the link to print out the farm animals??
Hi Jacqueline! Once you enter your email address the Farm Animal Stick Puppets will be emailed to you instantly. If you have any trouble receiving them, please email us at CustomerCare@HowWeeLearn.com and we can send them to you directly!