Science experiments for kids are big in our home. My kids love them—and so do I. While teaching Kindergarten, I made science experiments a priority. Kids are so naturally curious about the world around them, and science experiments bring this learning fully to life!
This is my ABSOLUTE favorite science experiment of all time—oh yes, I promise it is THAT GOOD!
I even included this science experiment in Kindergarten at Home, my curriculum for children ages 4 to 6. Kindergarten at Home consists of 18 units, each spanning two weeks. This science experiment is part of the unit all about leaves! Your little one will make leaf art, prepare a fresh salad with you in the kitchen, practice their literacy skills through some fun leaf activities, and so much more.
Take a peek inside! Check out Kindergarten at Home right here: https://shop.howweelearn.com/pages/kindergarten-at-home
 |
 |
 |
Why Do Leaves Change Color?
When asked by my eldest daughter at age 3 (don’t ask me how many years ago that was!), “Why do leaves change color?” I had no answer.
I looked it up and found it too complicated for a 3-year-old, but I explained the best I could and let it be.
I was in Teacher’s College at the time, and wouldn’t you know, a few weeks later, we learned about—and did—a science experiment for kids about leaves changing color!
It made things so much clearer that I immediately did the experiment with Madeline. And my future Kindergarten classes. And my future children. Multiple times. Yep, it really is that good!
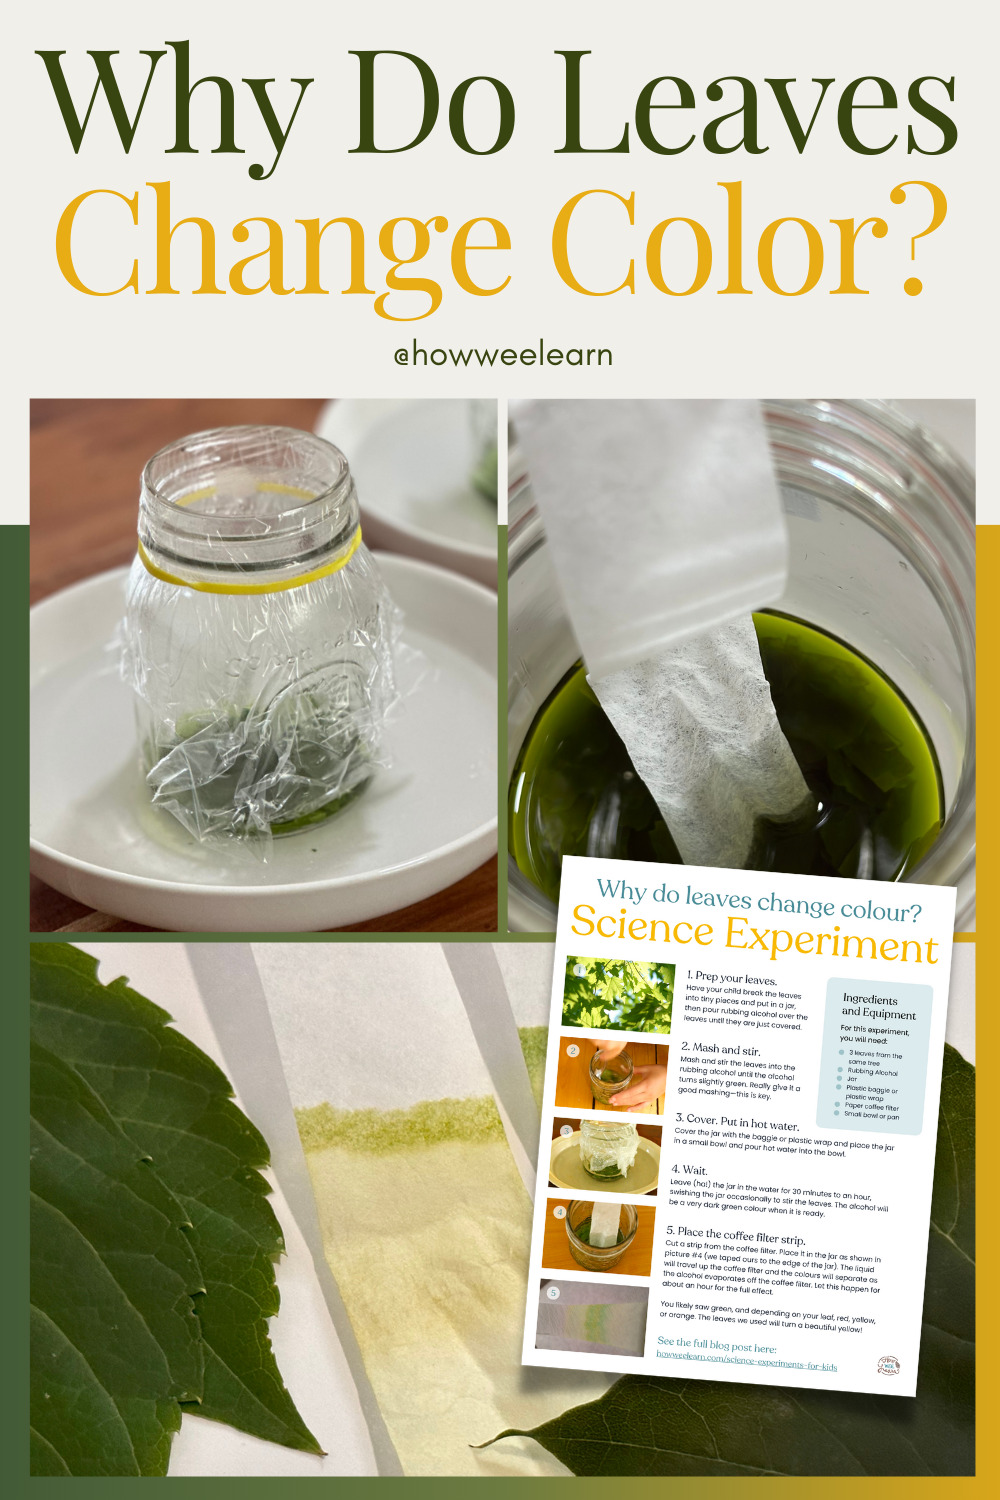
Before we get started, be sure to download your Free Printable with step-by-step instructions for this fascinating Why Do Leaves Change Color? Science Experiment:

Please keep in mind this is my (limited) understanding, having done the experiment and some research in that class. I’d love to share it with you. So…
The Science Experiment!
Leaves contain chlorophyll. Chlorophyll makes the leaves green and is so dominant that it covers up all the other colors in the leaves. To figure out what color a leaf would be without the dominant chlorophyll color, we can separate the colors by doing this science experiment.
This experiment is very simple, and you likely already have everything you need!
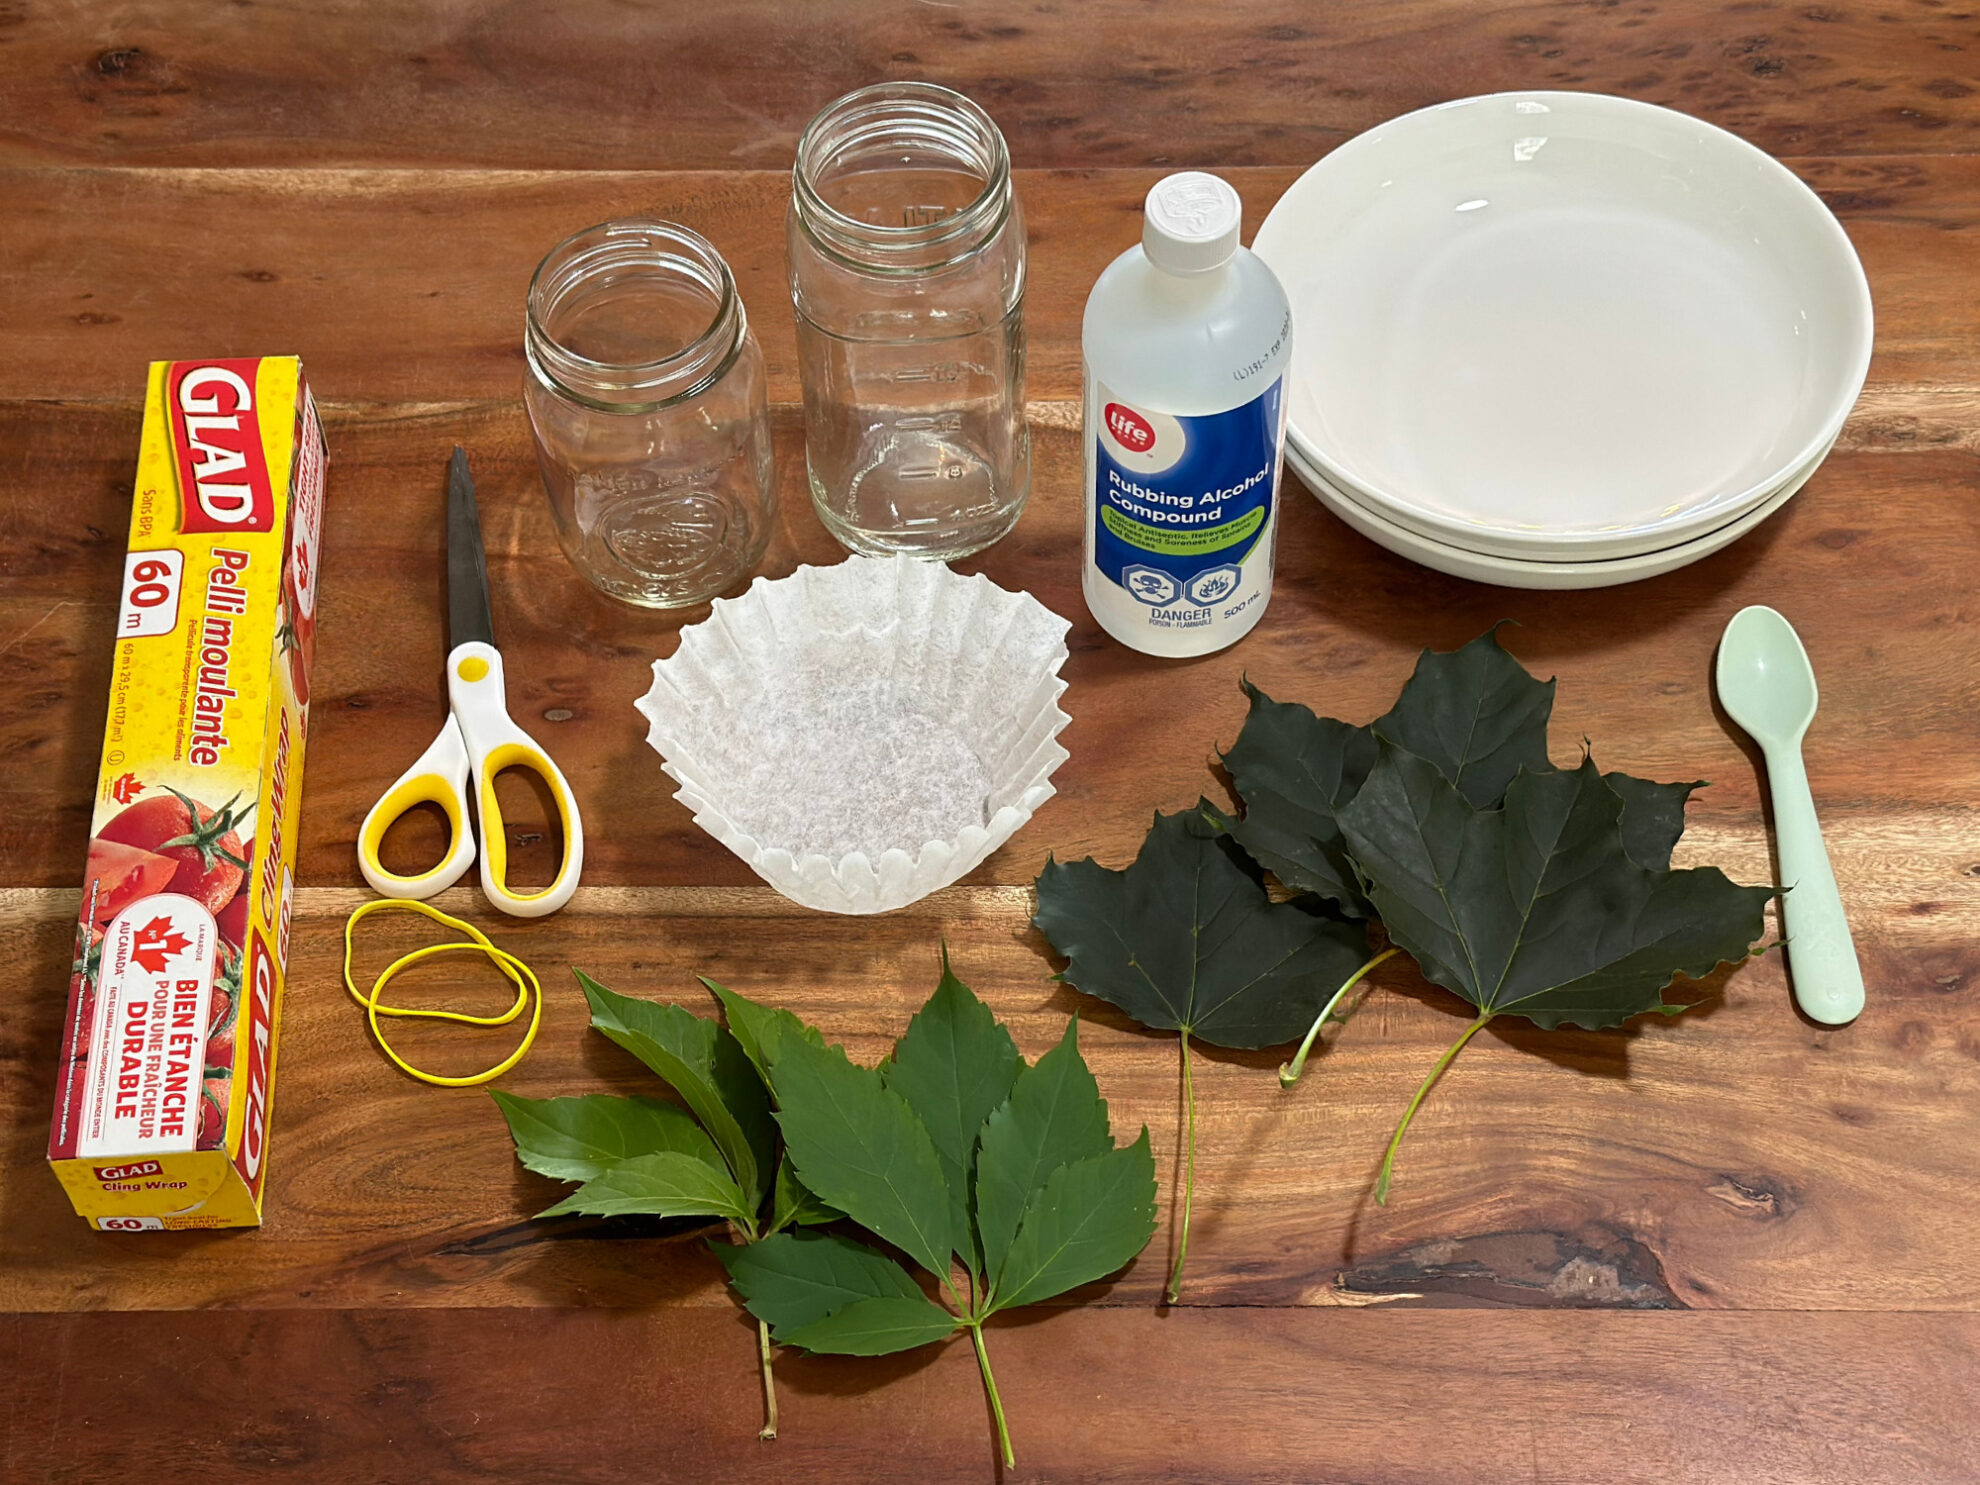
Materials:
- three leaves from the same tree
- rubbing alcohol
- glass jar
- plastic baggie or plastic wrap
- paper coffee filter
- small bowl or pan
- spoon
- scissors (optional to cut the coffee filter)
- elastics (optional to hold the plastic wrap in place)
- tape (optional to hold coffee filter in place)
Steps:
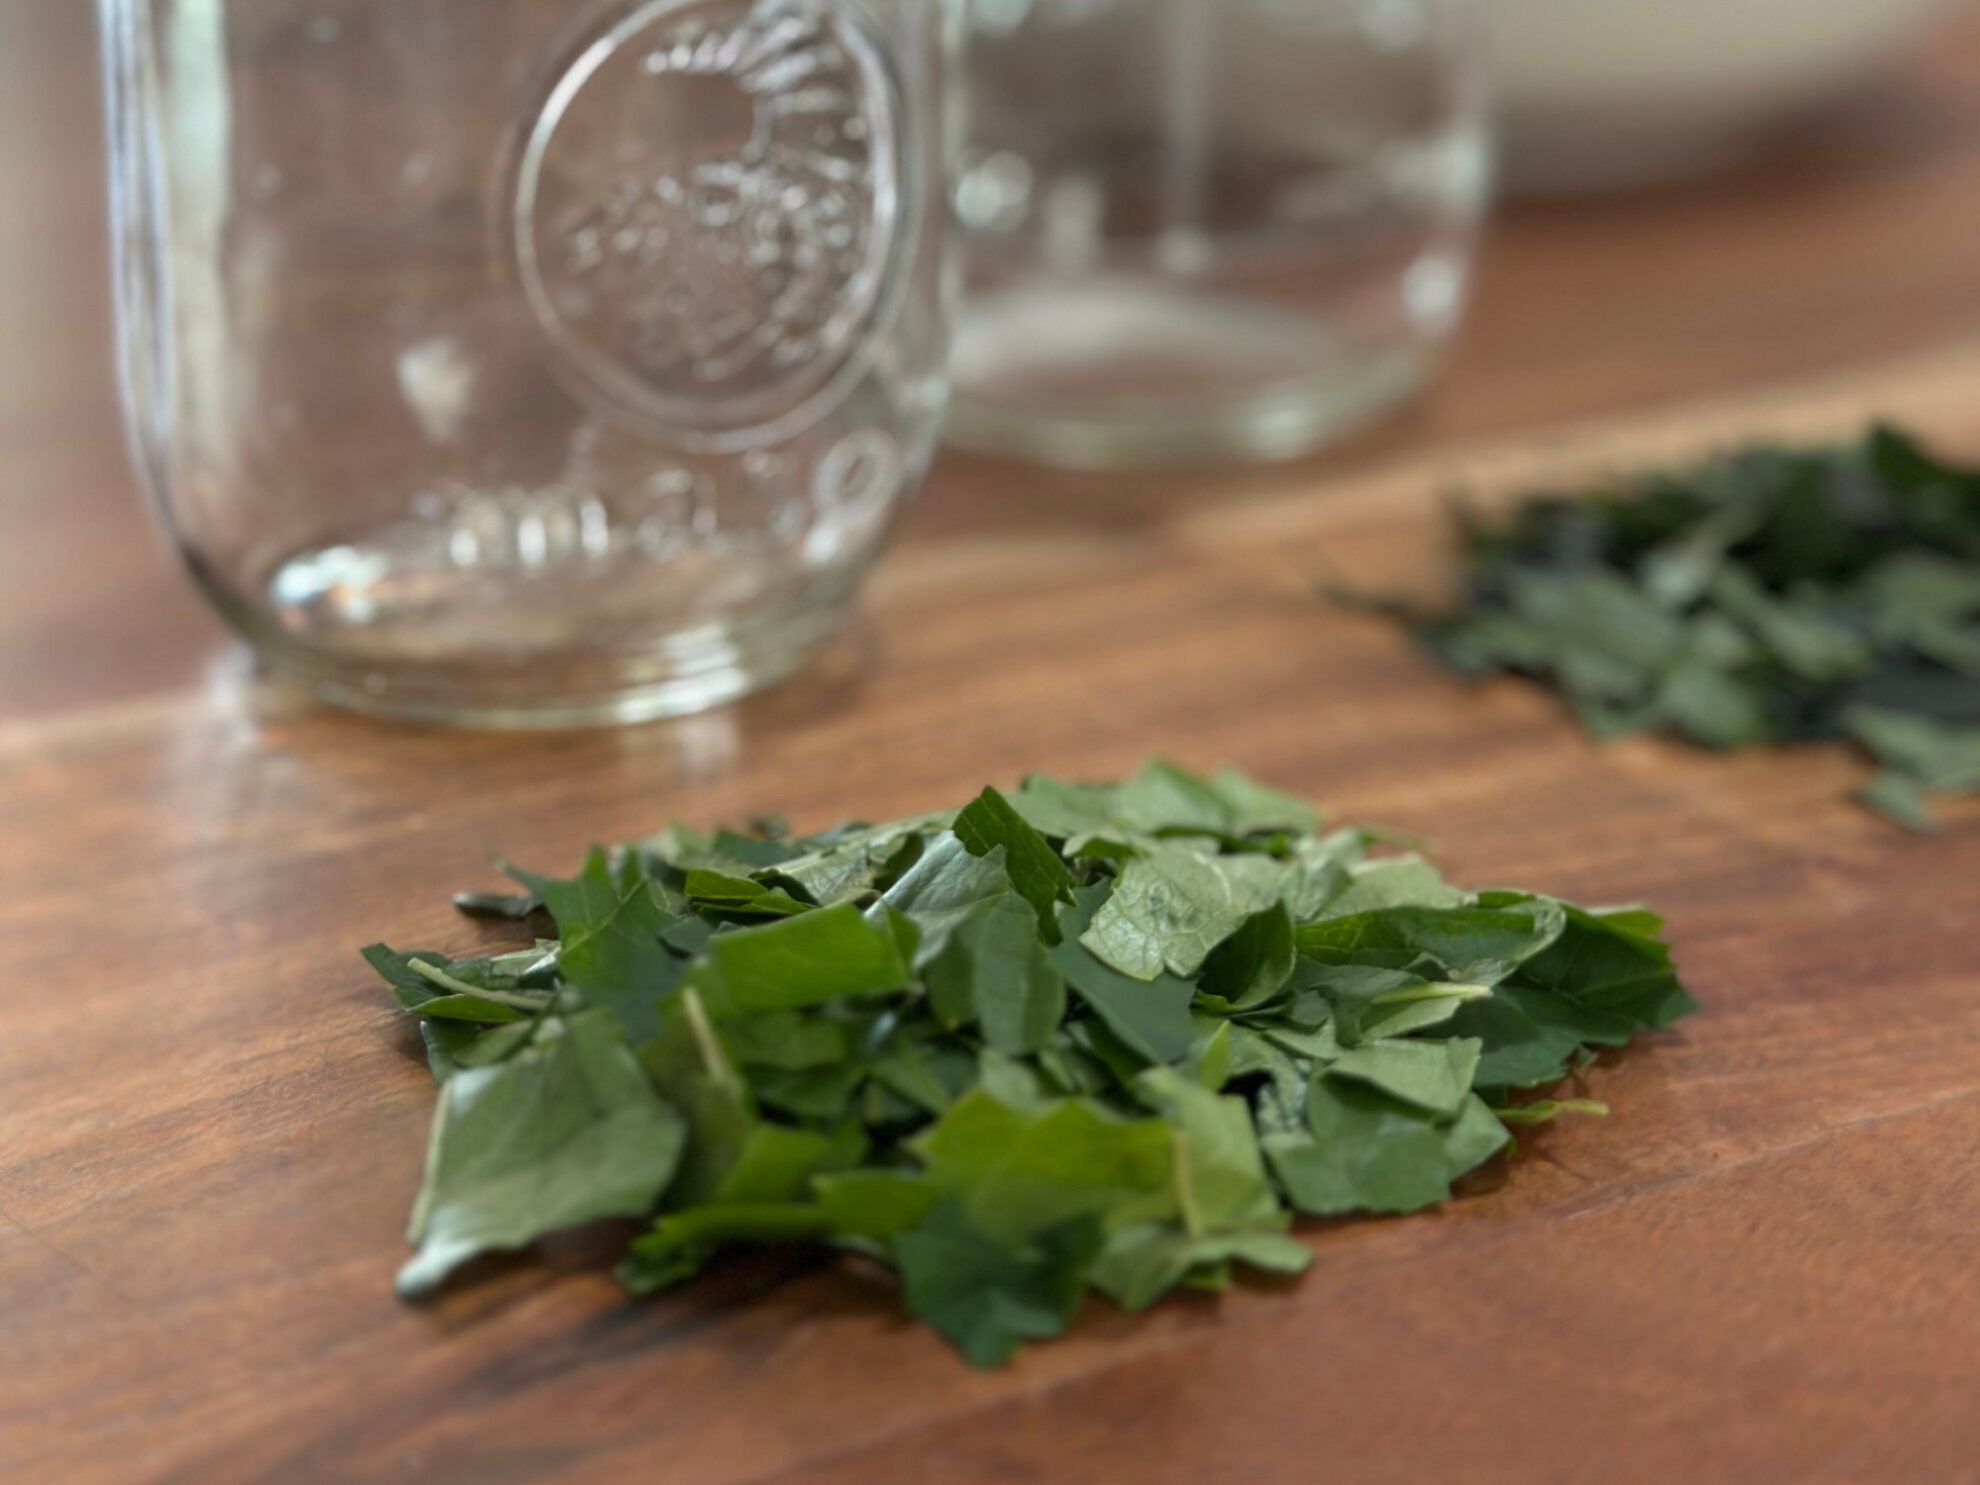
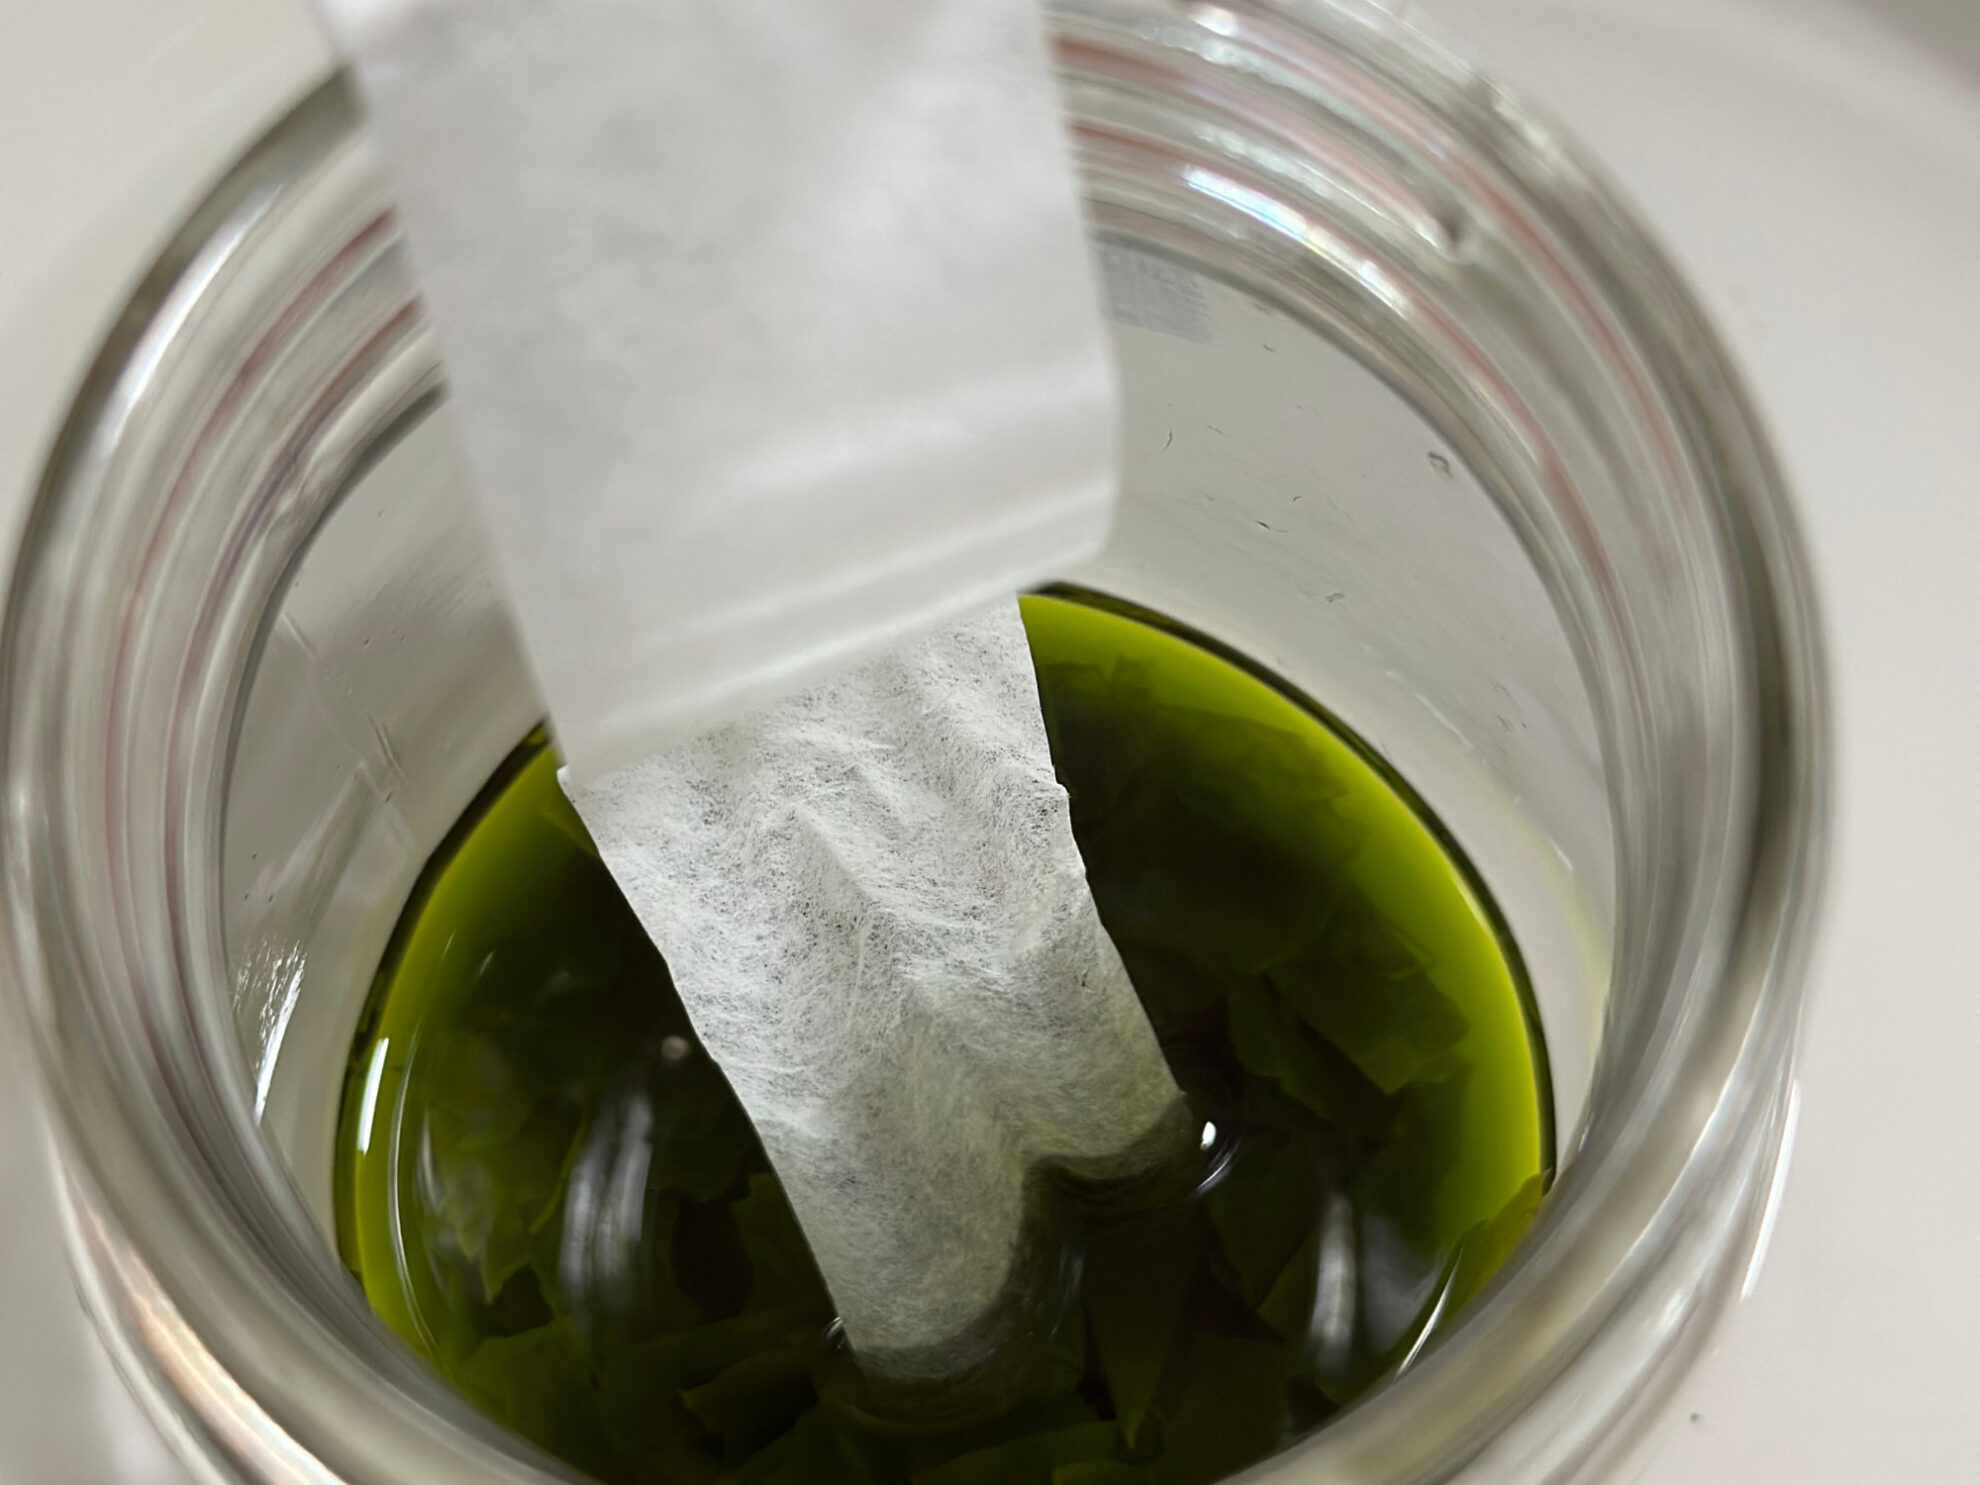
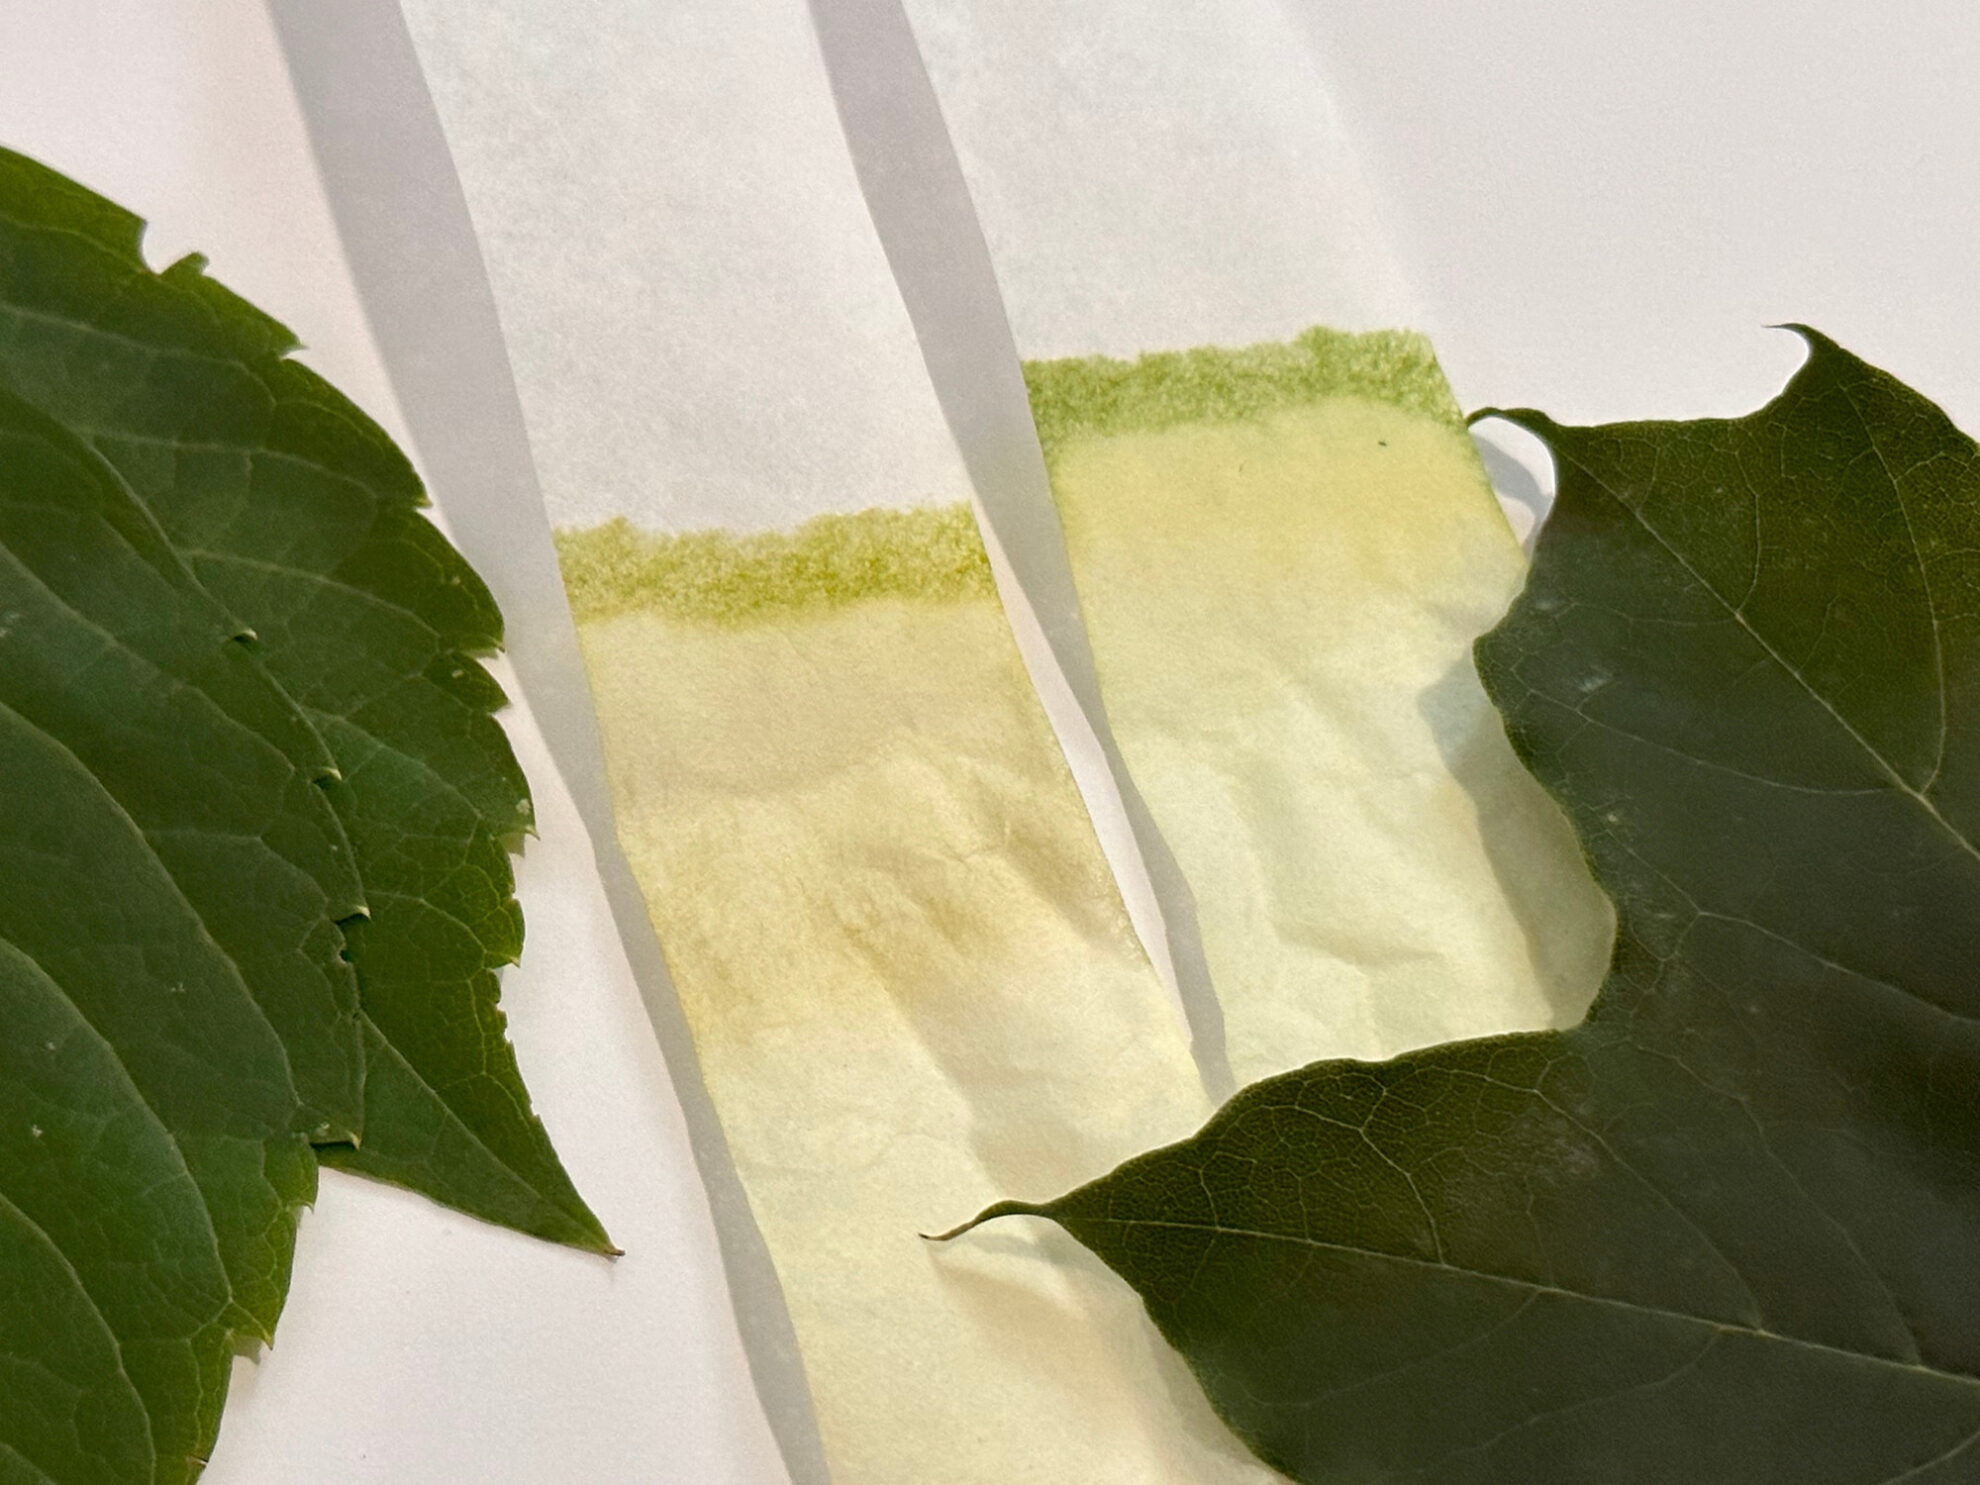
1. Have your child break the leaves into tiny pieces and put them in the jar. We decided to try leaves from two different trees to see how the results compare (being careful to keep each pile of leaves separate).
2. Pour rubbing alcohol over the leaves until they are just covered. A feline supervisor is optional, but highly encouraged.
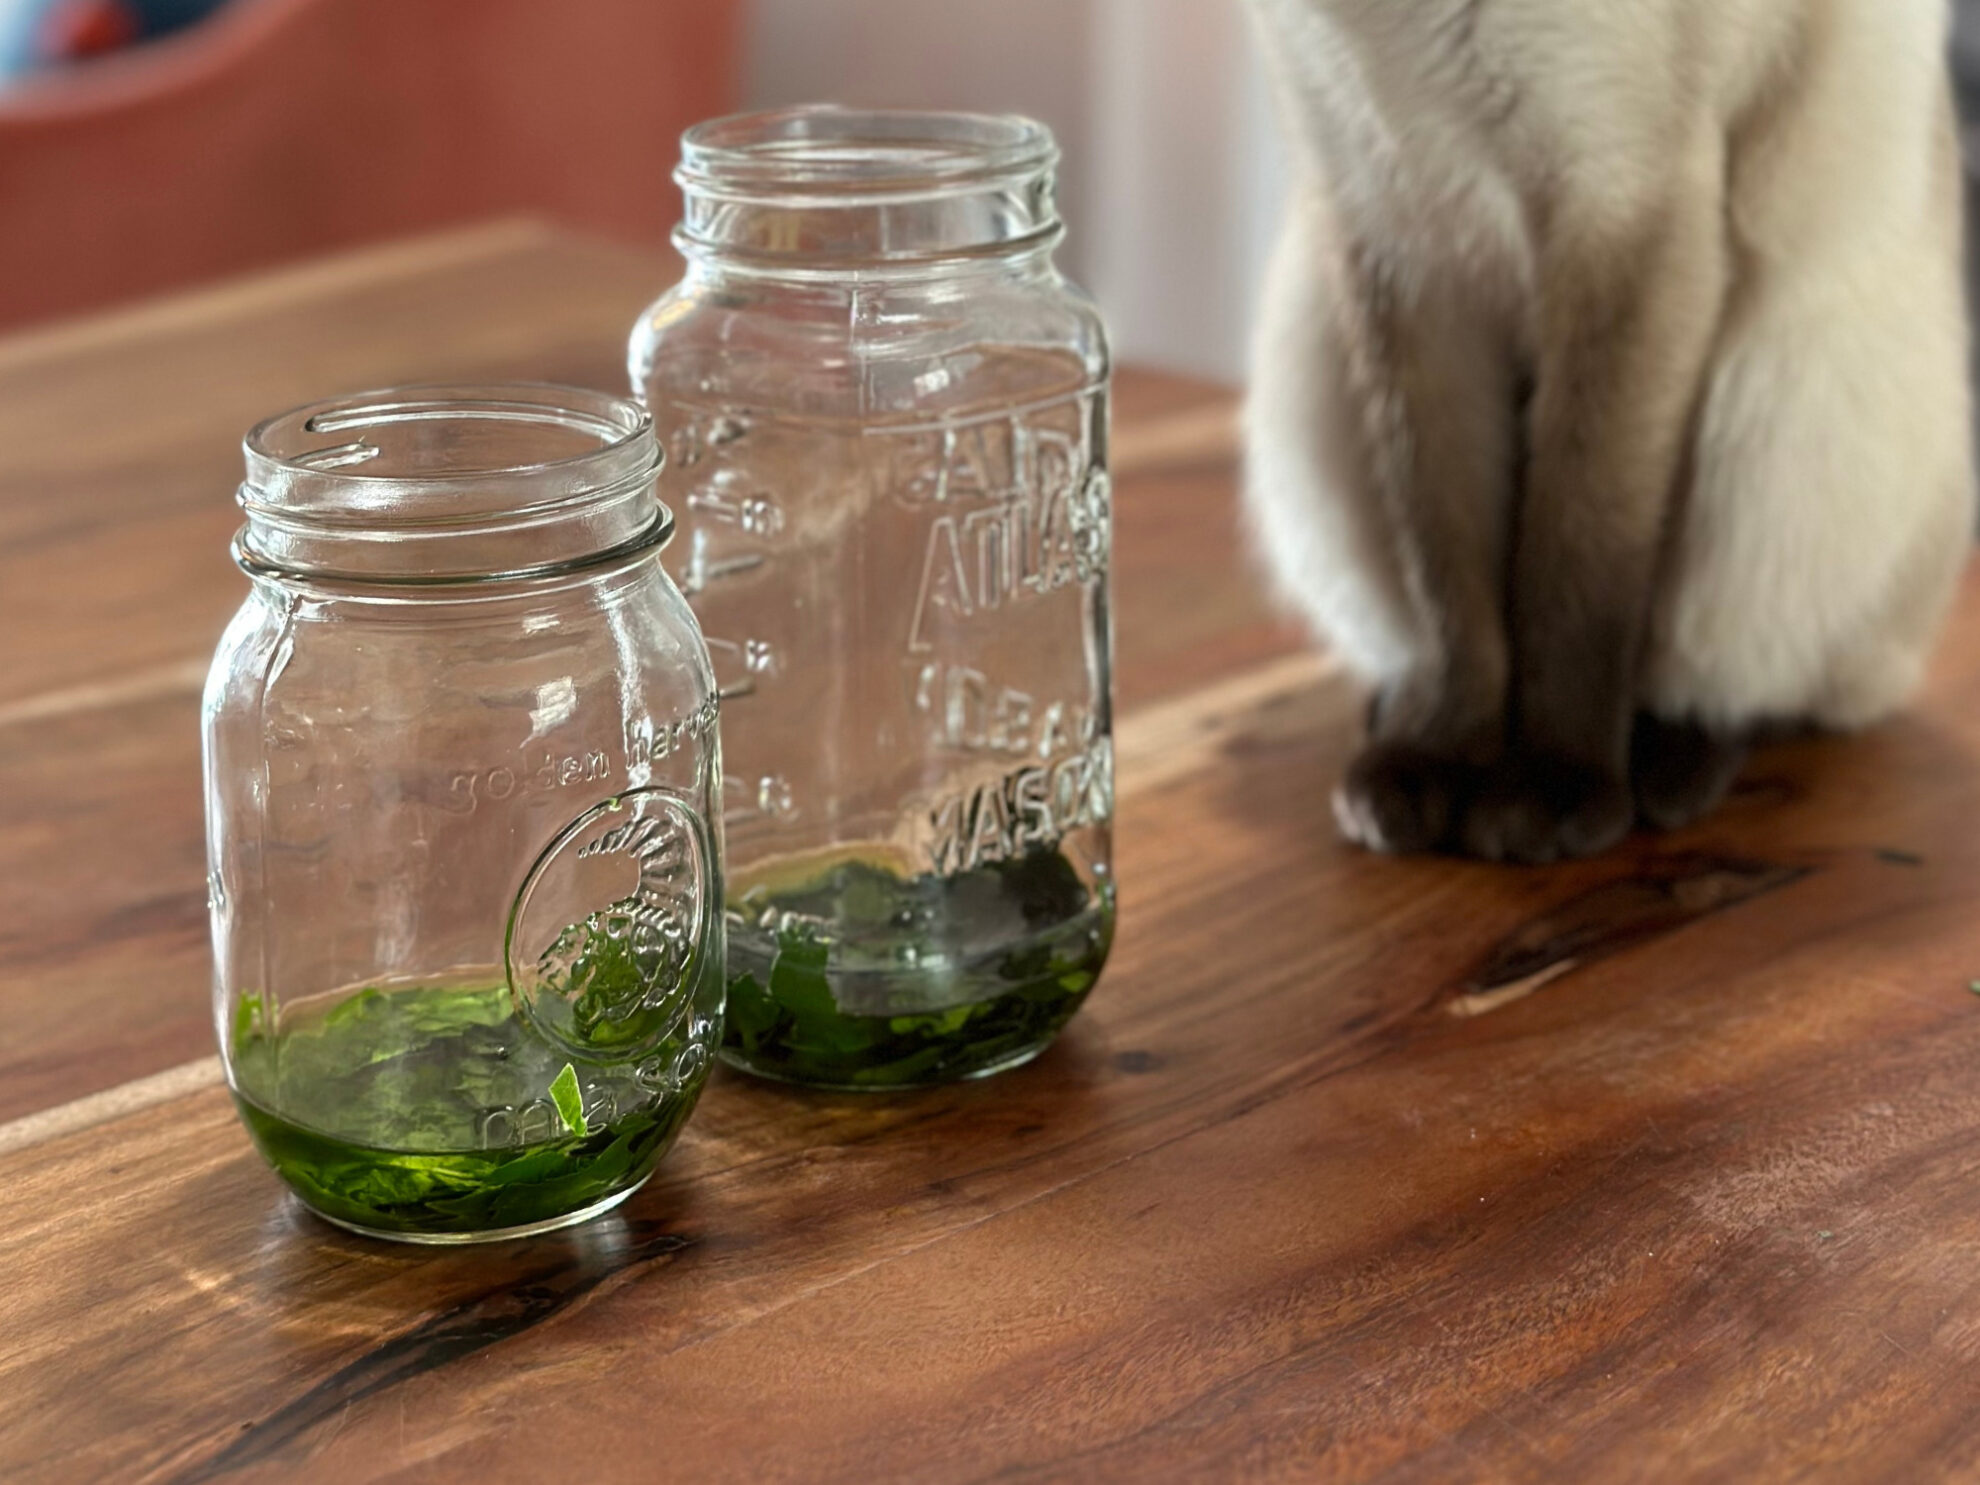
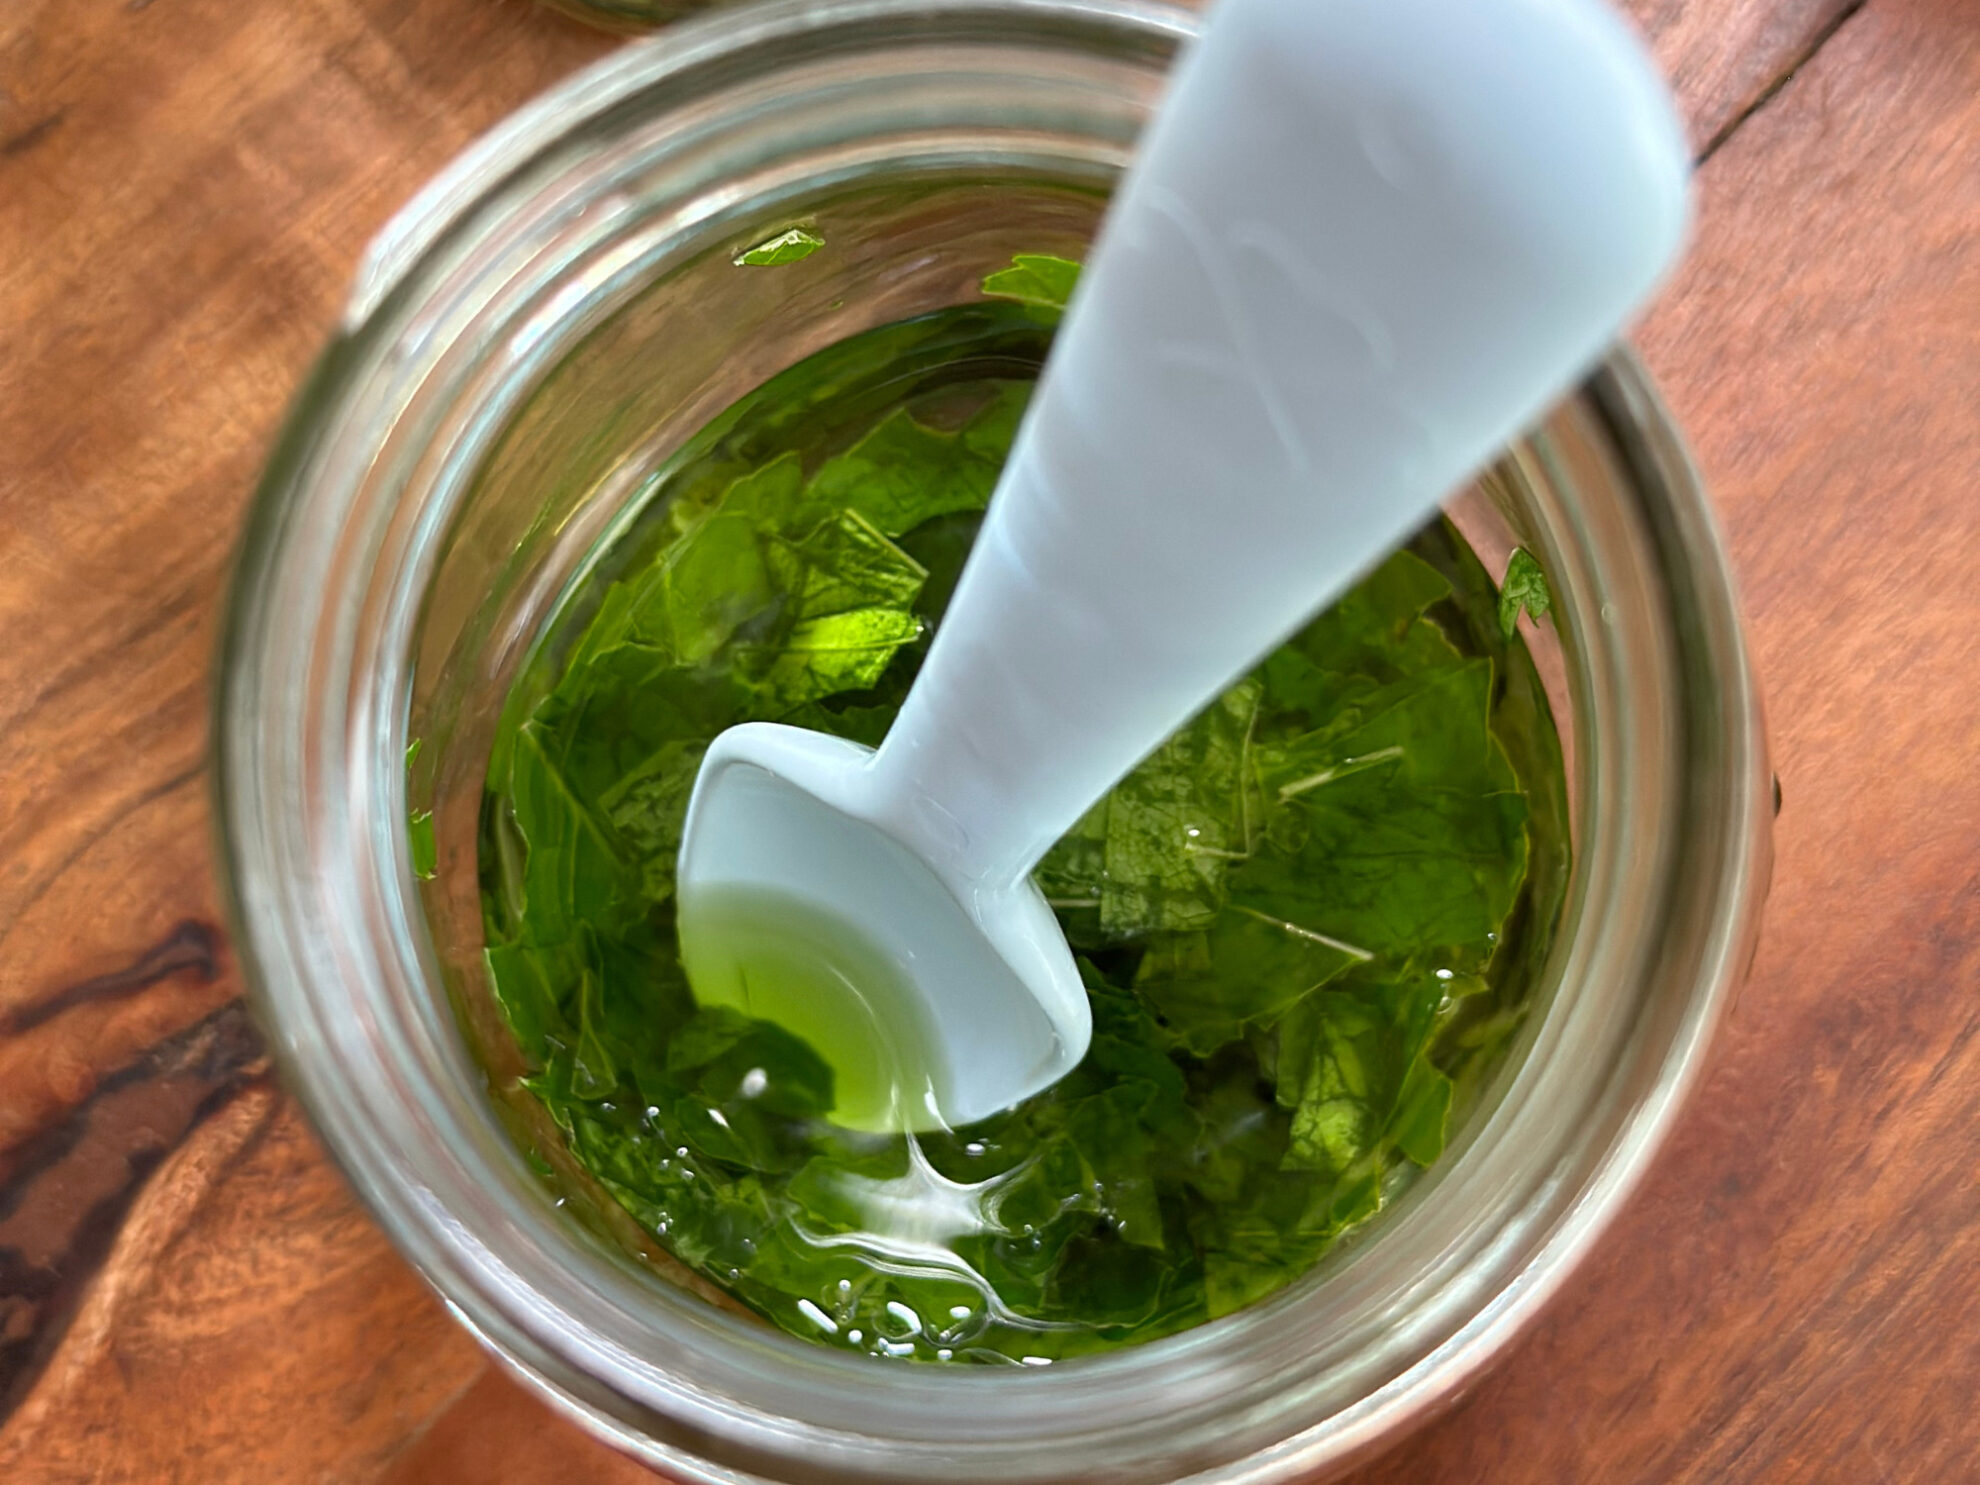
3. Mash and stir the leaves into the rubbing alcohol until the alcohol turns slightly green. Really give it a good mashing—this is key. We used a plastic spoon so we could really mush and poke the leaves without worrying about accidentally breaking the jar.
4. Cover the jar with a baggie or plastic wrap. We used a rubber band to help hold it in place. Place the jar in a bowl and pour hot water into the bowl.
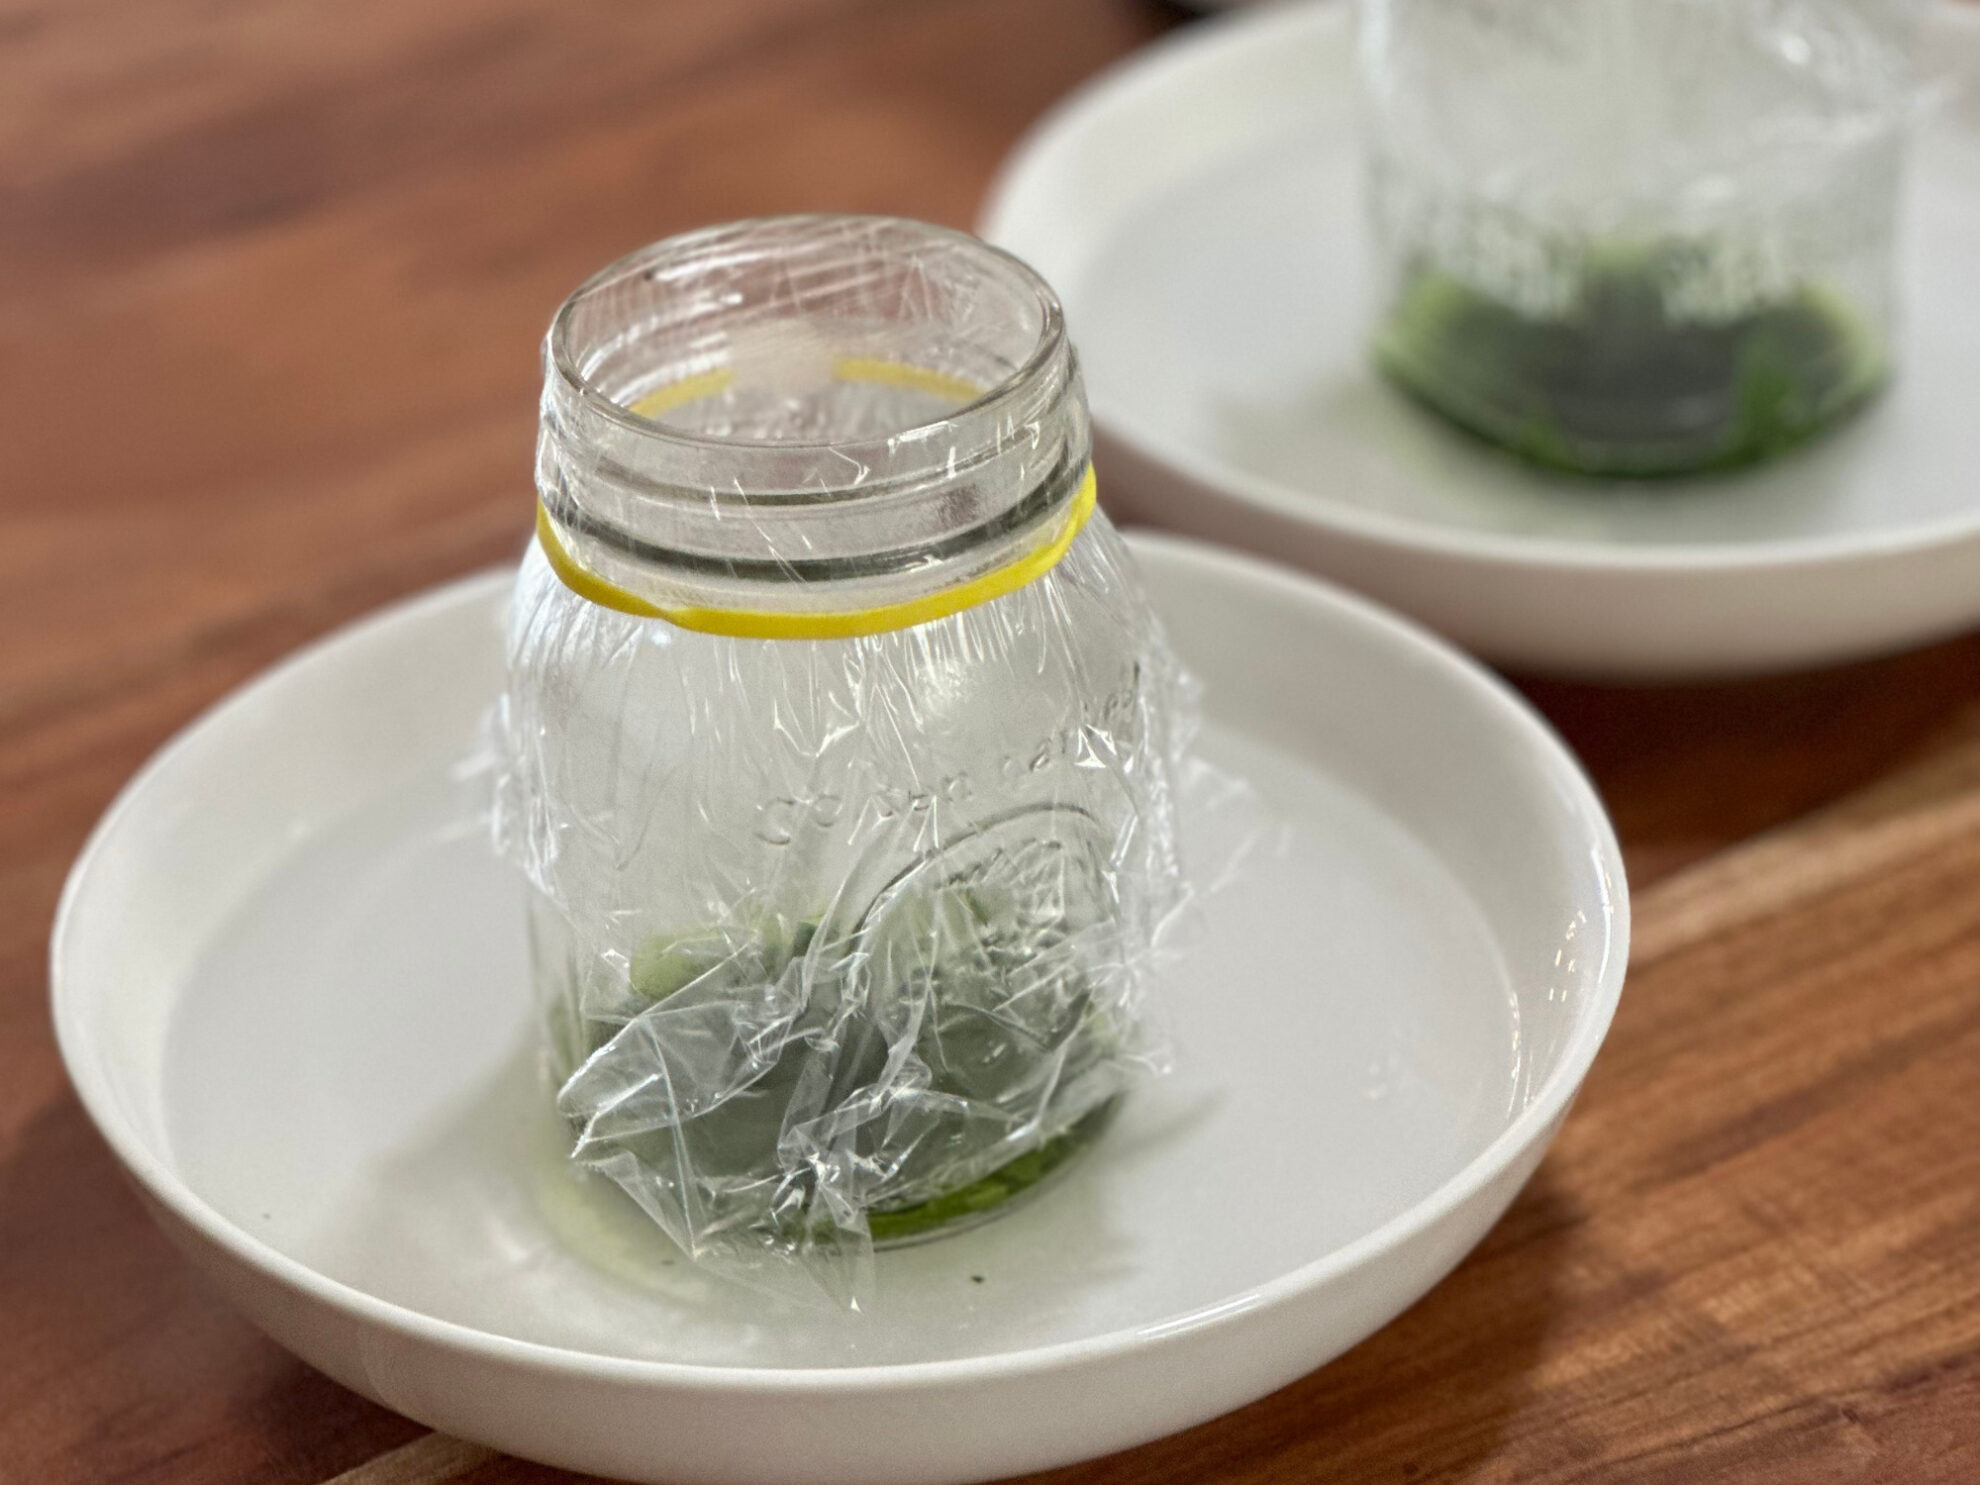
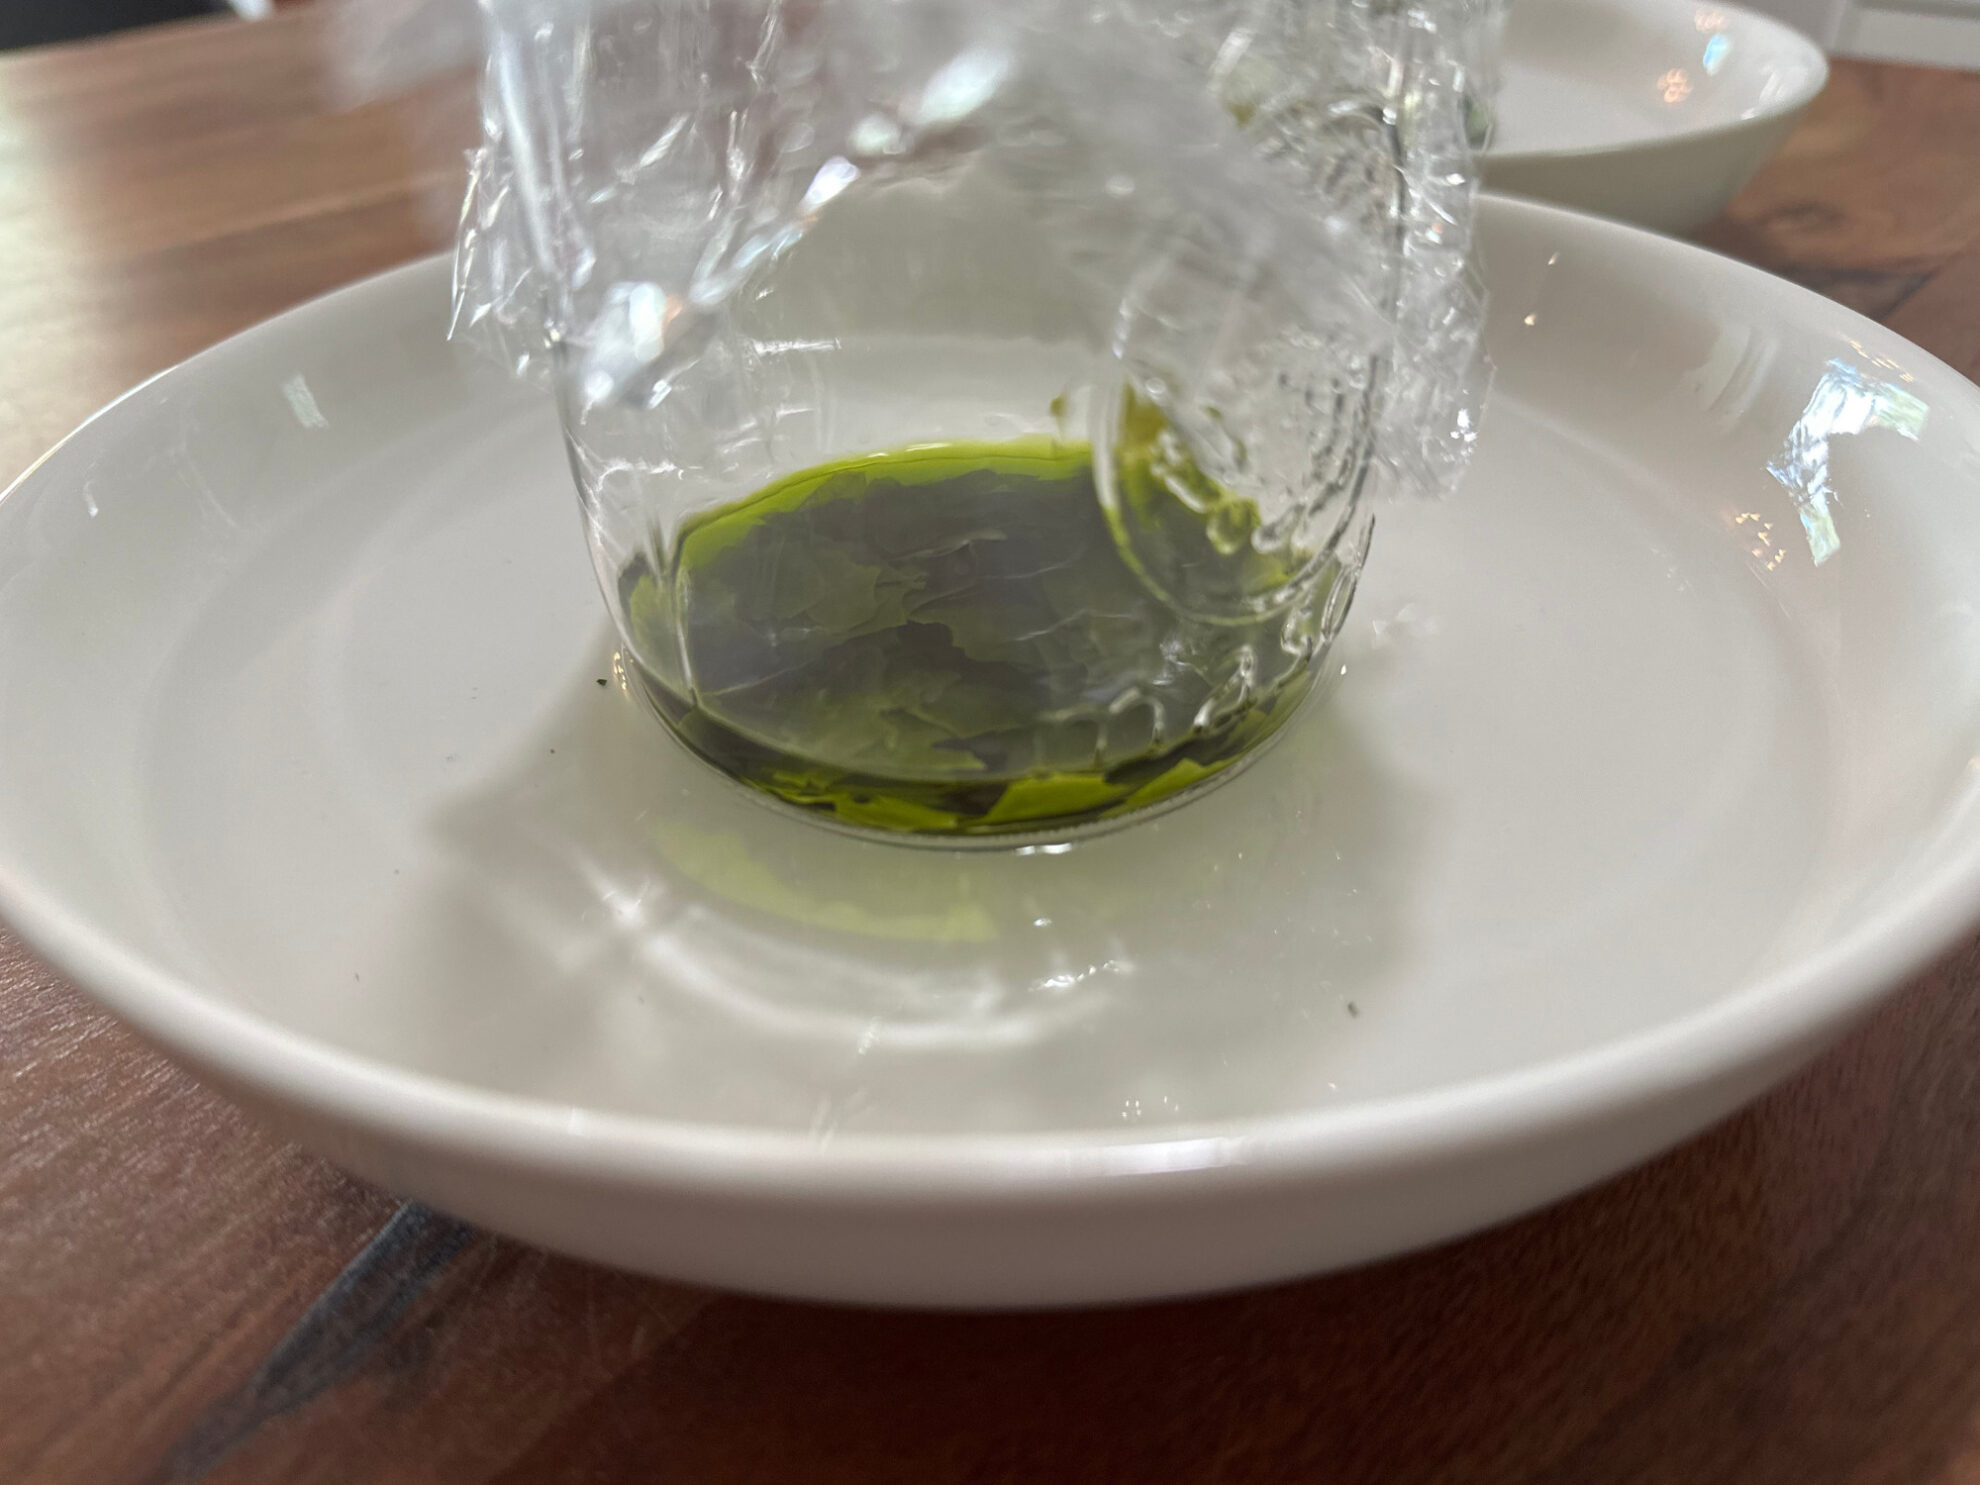
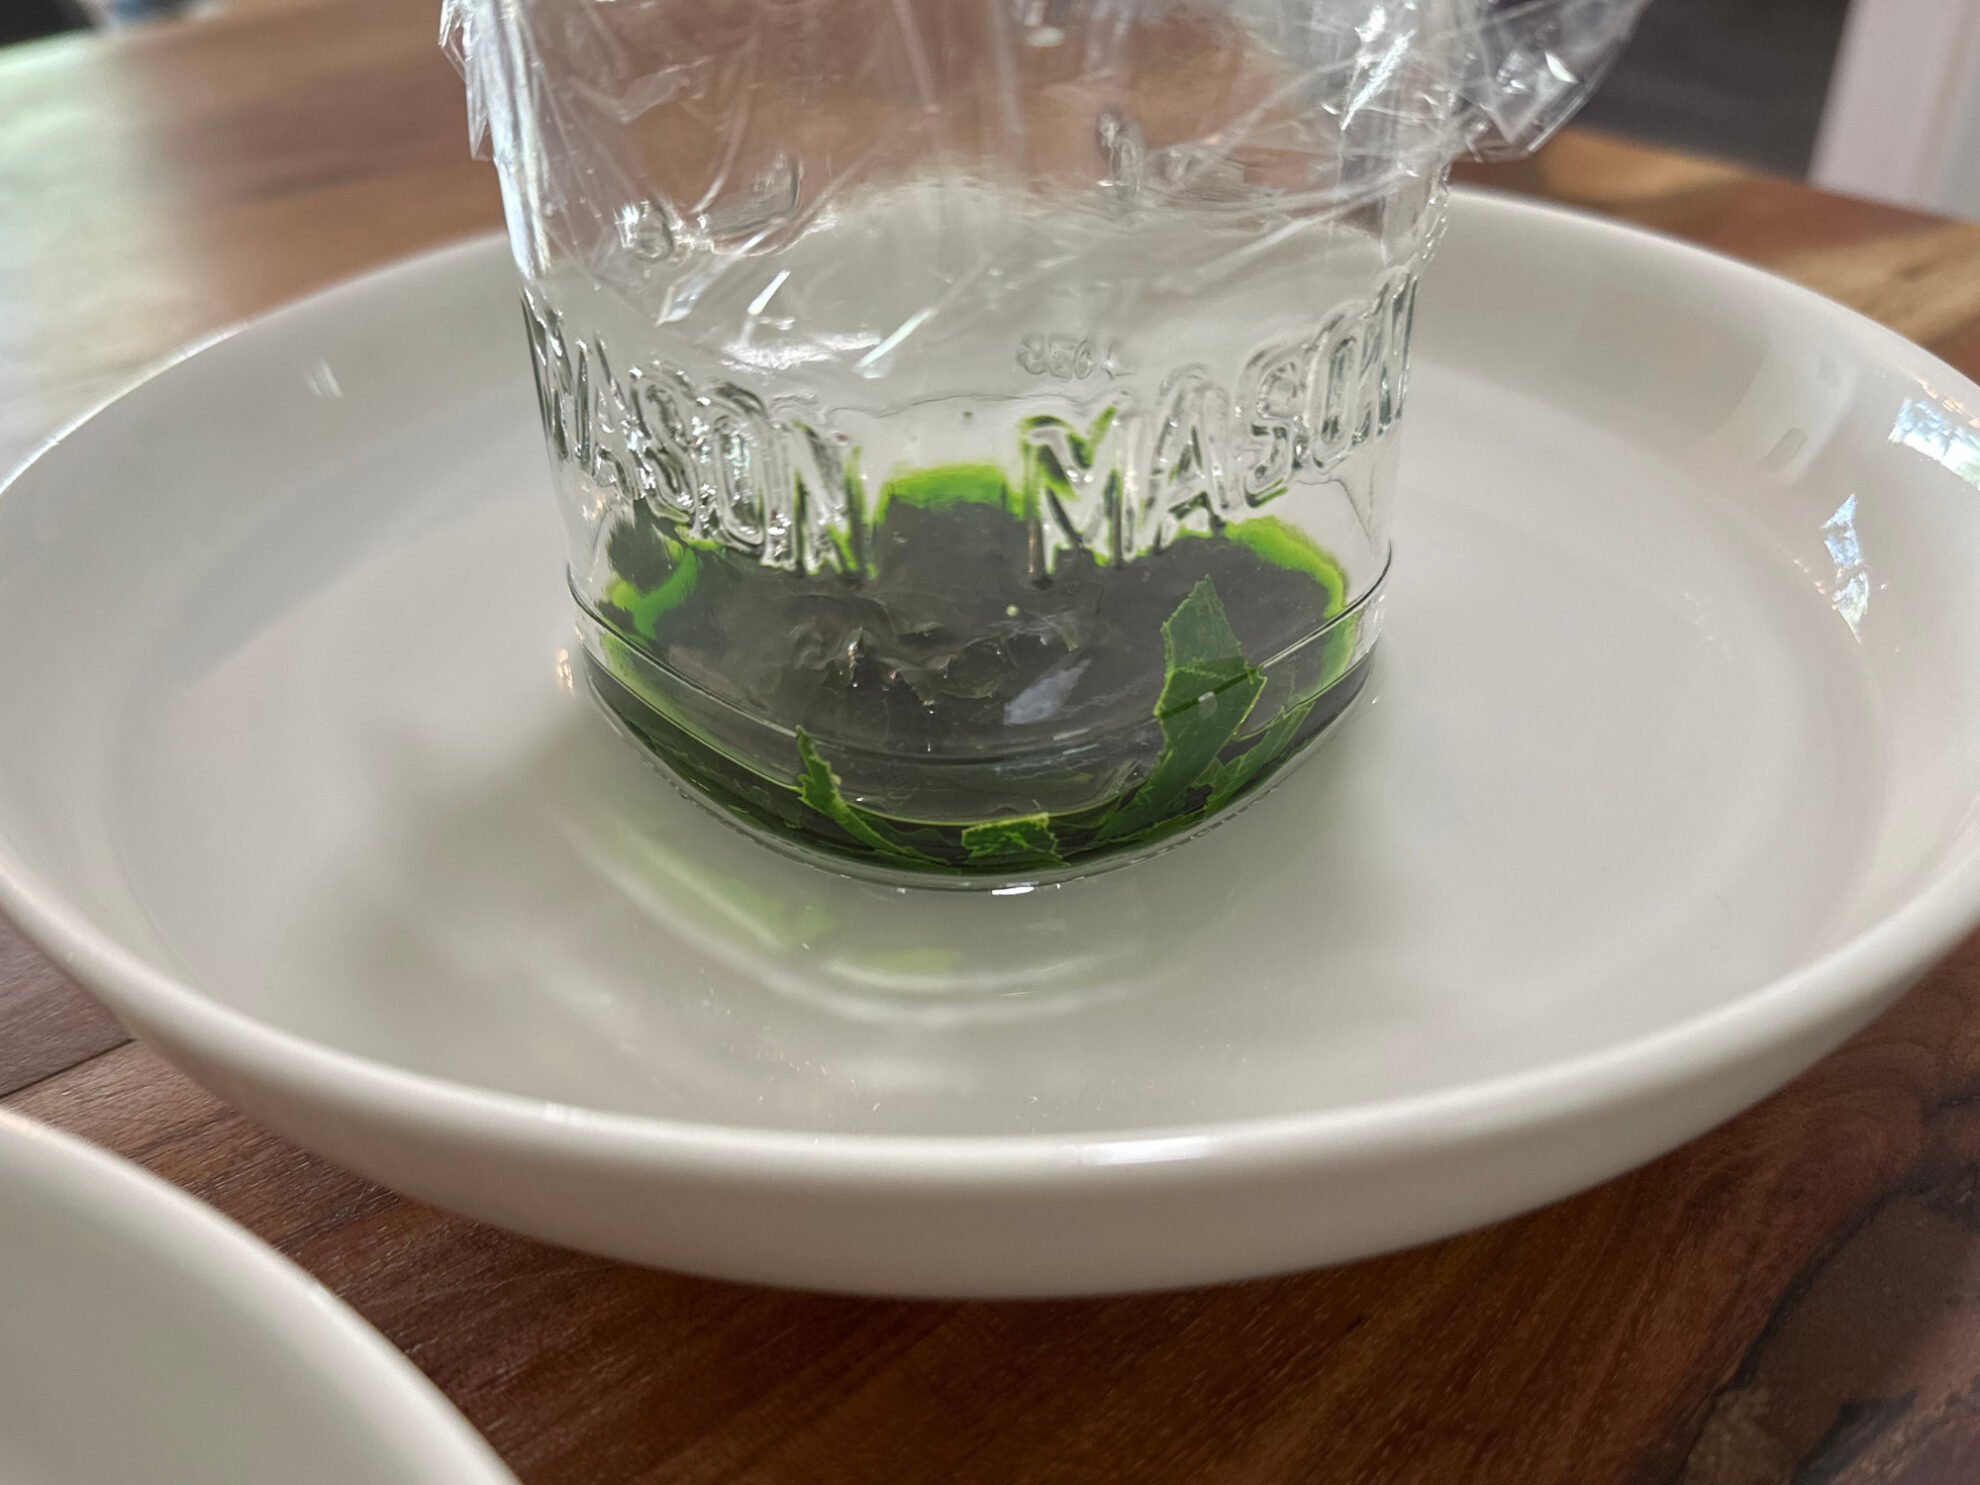
5. Leave the jar in the hot water for at least 30 minutes, occasionally swishing the jar to stir the leaves. The alcohol should be a dark green (leave longer if needed). If you can resist, wait 45 minutes or even an hour. We found the color difference in the rubbing alcohol at this stage interesting! Is the chlorophyll perhaps stronger in the leaves on the right?
 |
 |
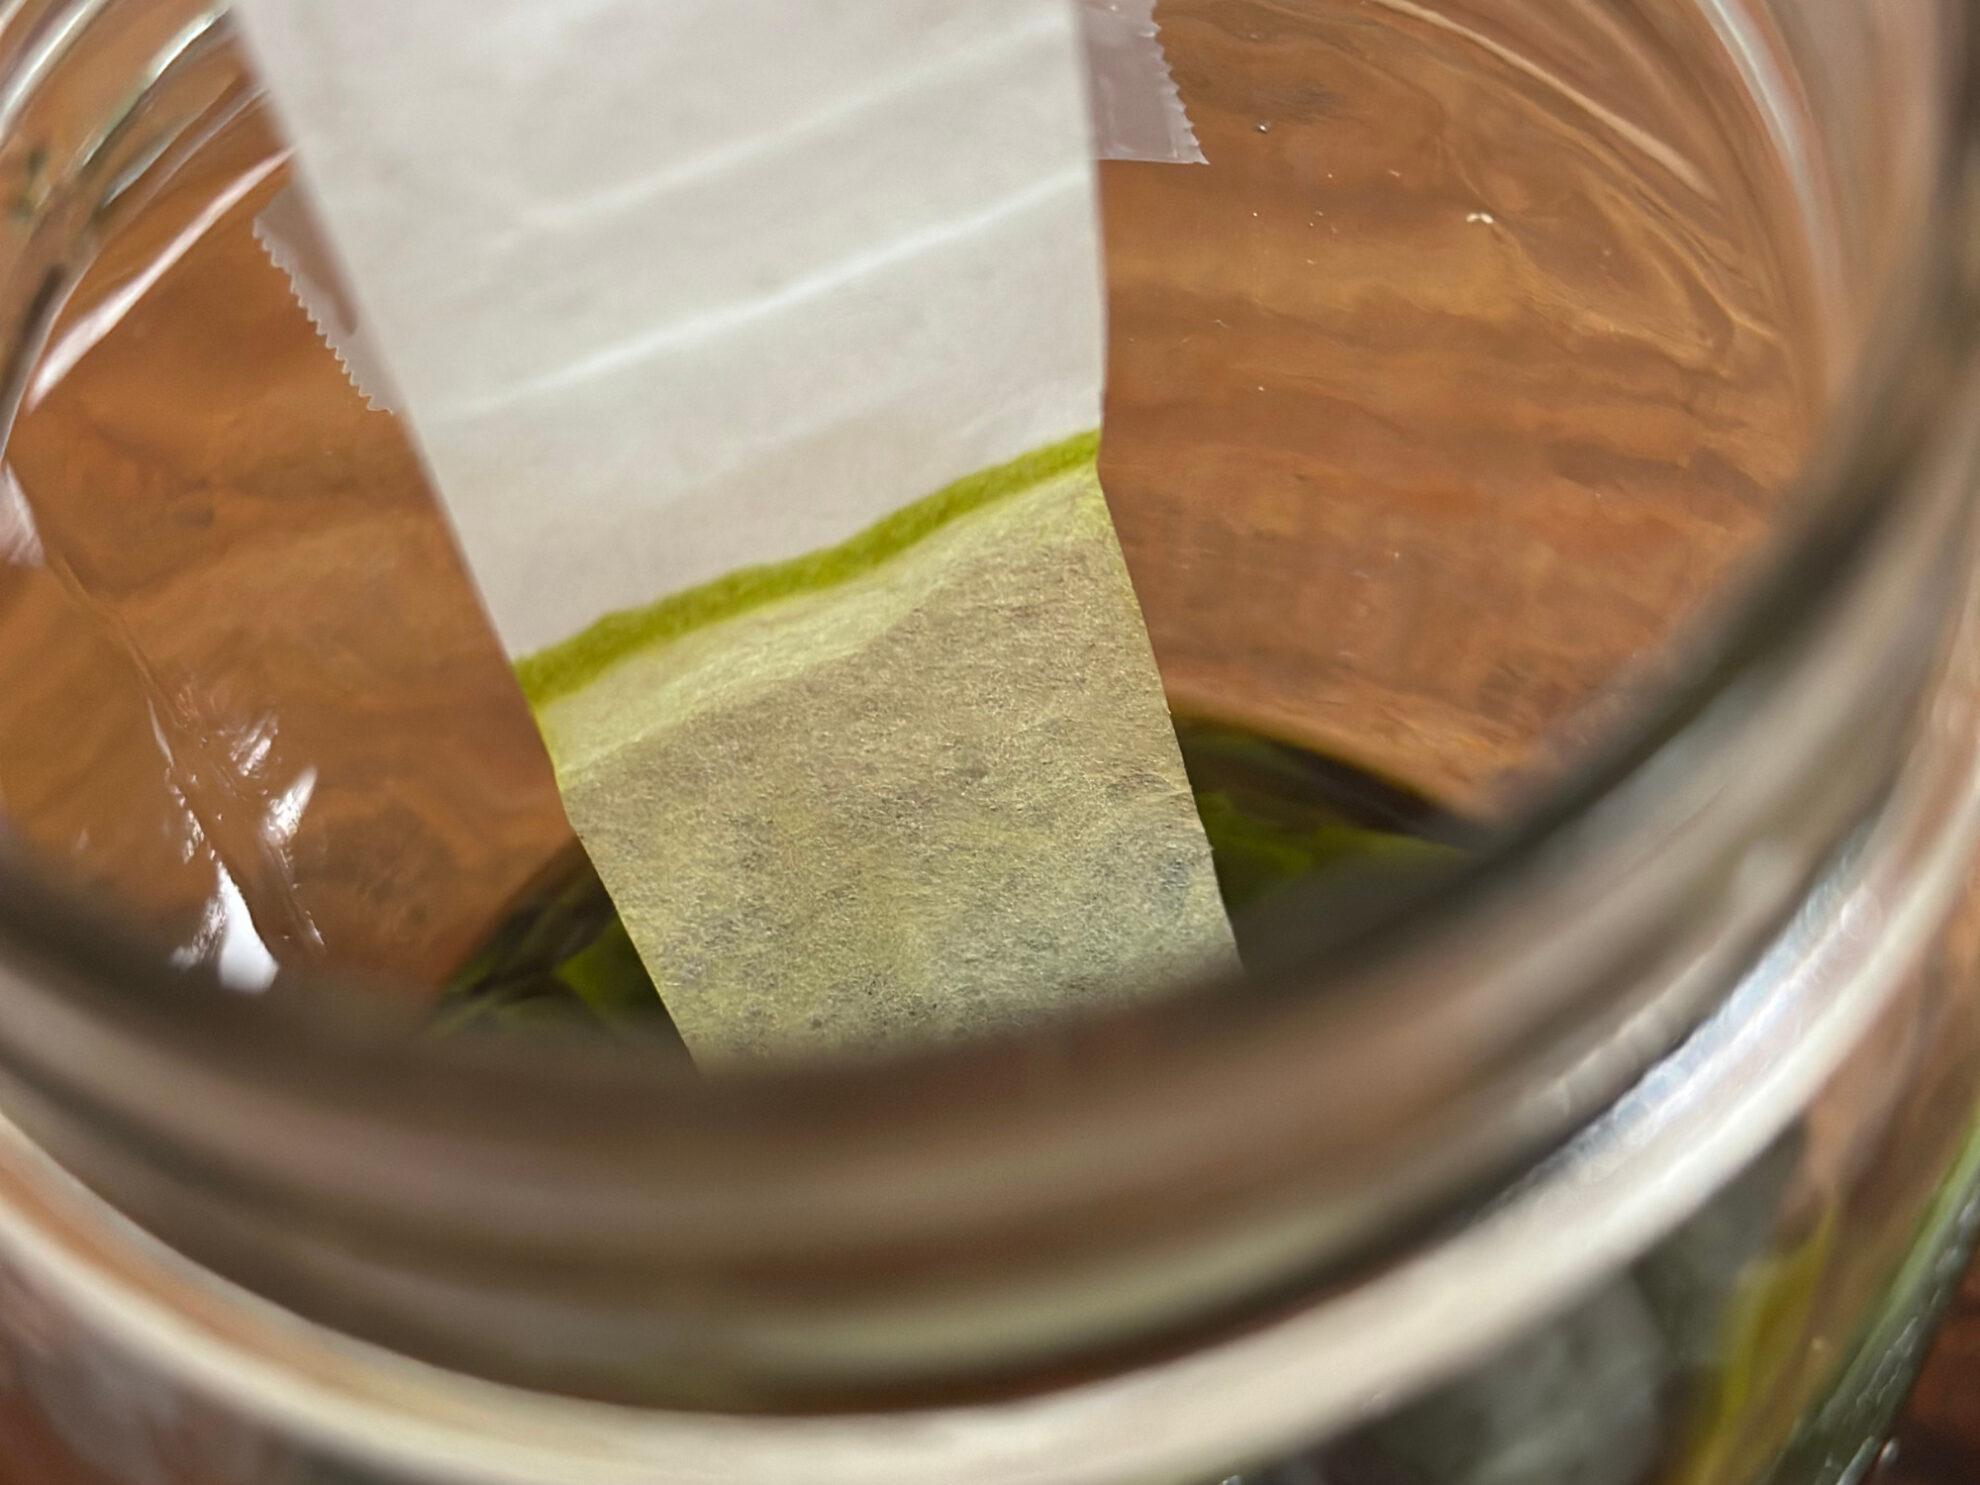
6. Cut a strip from the coffee filter so it can reach the rubbing alcohol. Place it in the jar, and secure it with a small piece of tape at the top edge if needed.
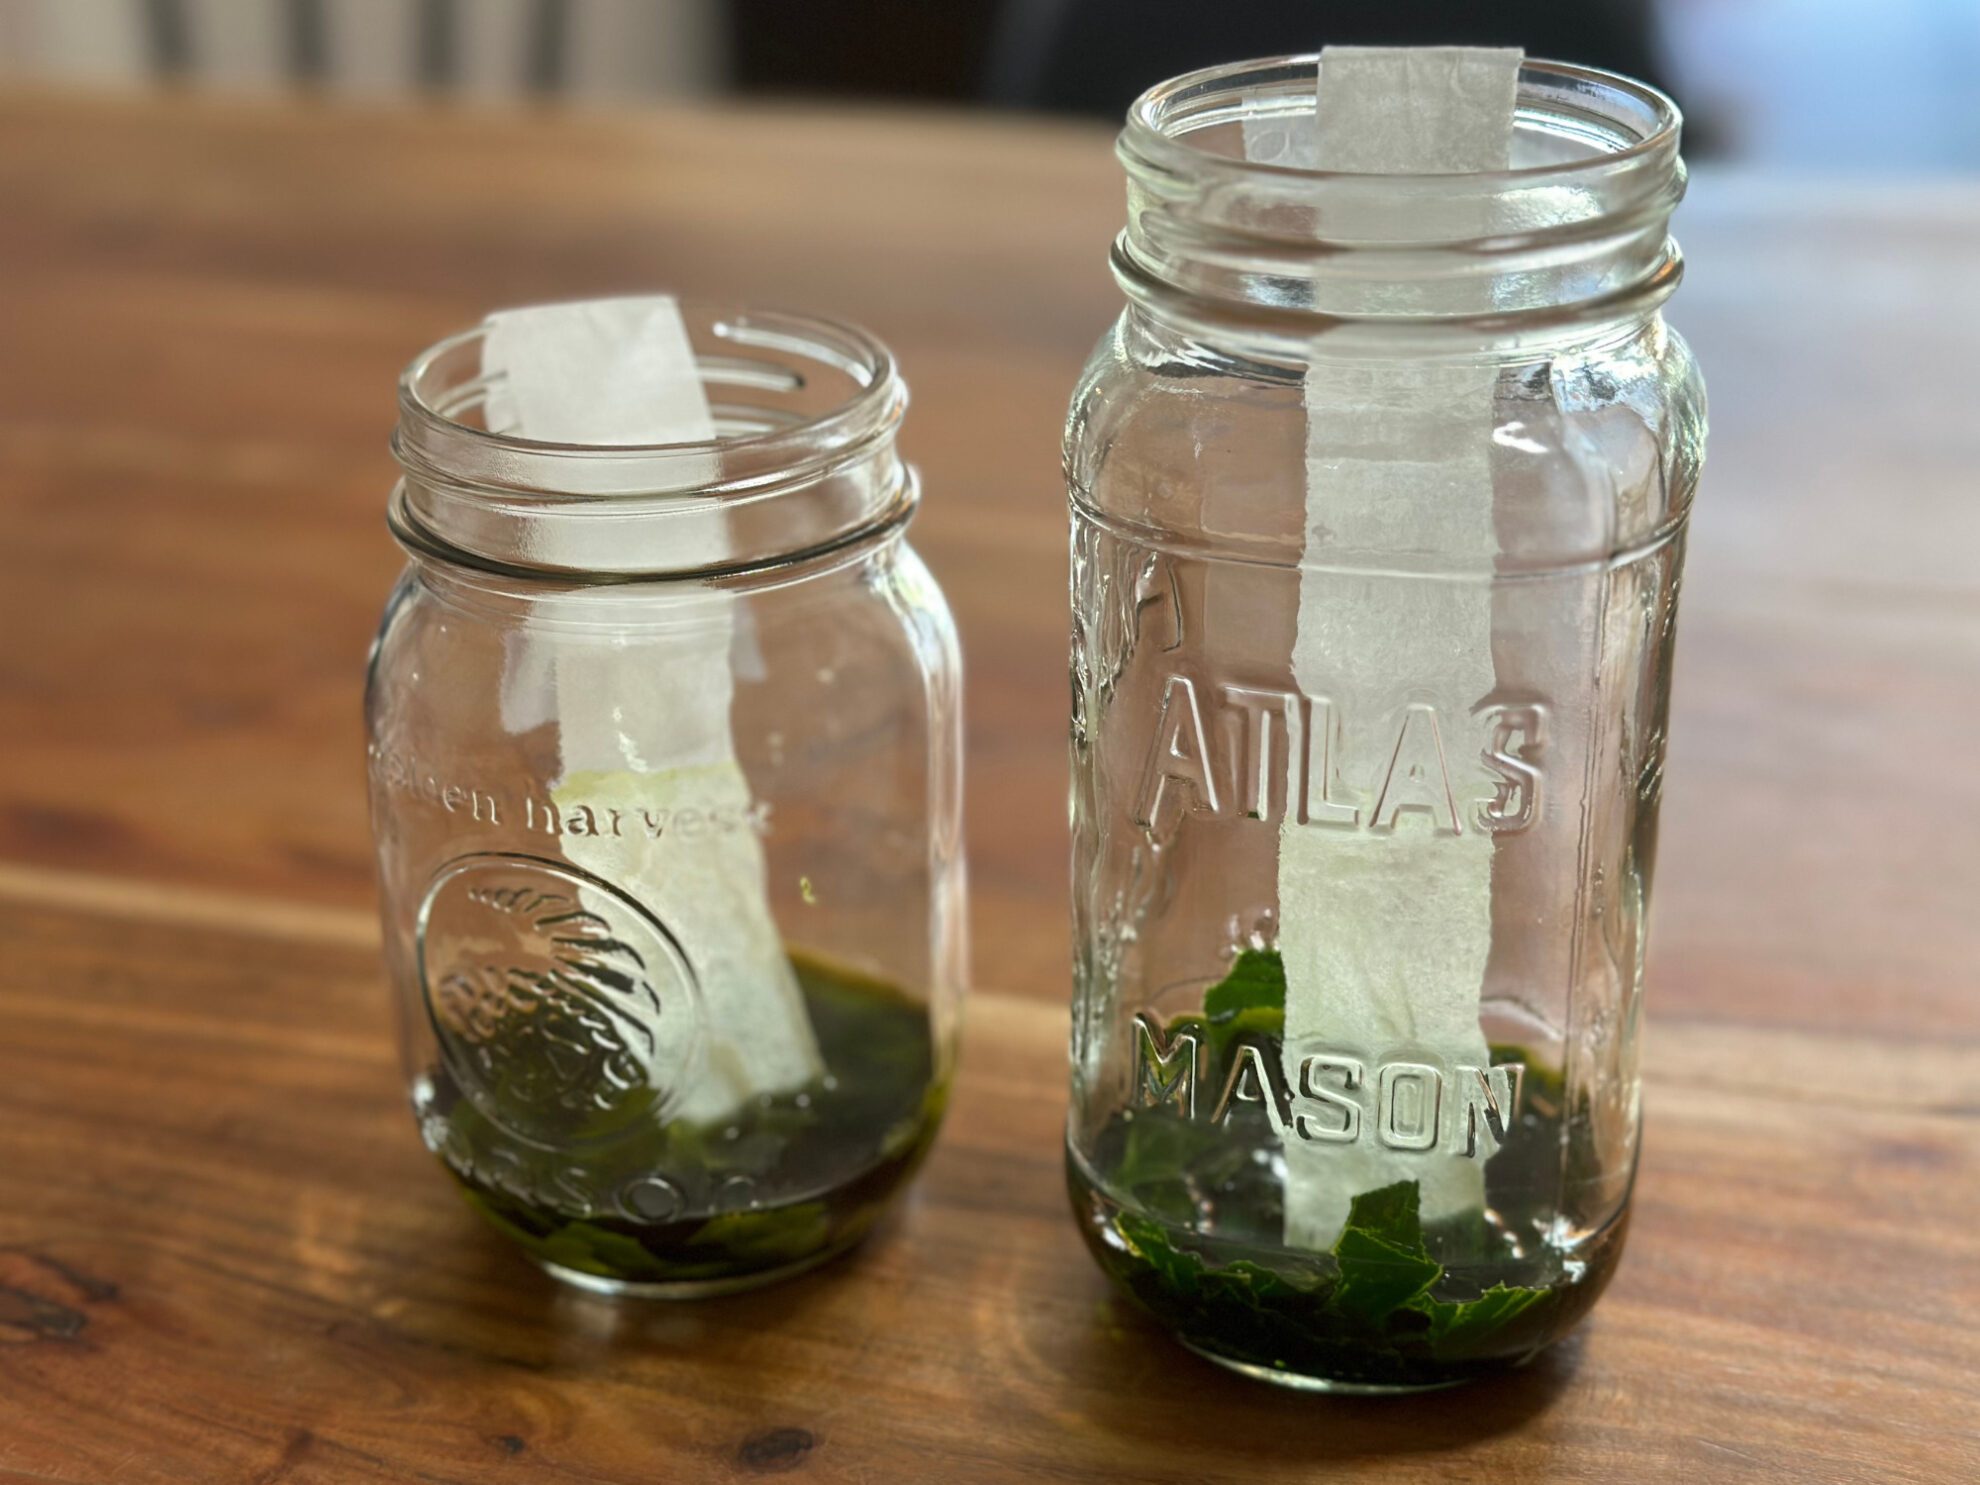
7. The liquid will travel up the coffee filter, and the colors will separate as the alcohol evaporates off the coffee filter. Let this happen for about an hour for the full effect.
 |
 |
There was definitely a difference between the two types of leaves we chose! While it was difficult to capture in the photo, we could see a lot of orange-red tones in the coffee filter strip on the left, and more yellow tones in the one on the right. We also noticed that the size of the orange-red tinge in the strip on the left was larger than the yellow tinge in the strip on the right.
And sure enough, the leaves on the left turn an orange-red shade in the fall, and the leaves on the right turn yellow!
So… Why Do Leaves Change Color?
In this science experiment, we used rubbing alcohol and energy (hot water) to separate the colors. You likely saw green and, depending on your leaf type, maybe red, yellow, or orange.
As we know, chlorophyll gives leaves their green color and is so dominant it hides the other colors in the leaves. But in the fall, chlorophyll in the leaves breaks down, allowing the other colors to finally shine through and show their beautiful reds, yellows, and oranges.
I hope you and your little ones enjoyed this experiment! Science is everywhere, and science experiments for kids are such a wonderful way to build on our children’s natural curiosity about the world.
If you’re ready for an entire year of Kindergarten activities planned for you–easy peasy and full of fun and wonder—check out Kindergarten at Home!
Your Complete 36-Week Curriculum for 4-6 Year Olds
https://shop.howweelearn.com/pages/kindergarten-at-home
|
|
|
Thank you so much for reading, my friend,
xo
Sarah


This is a great experiment. Not even just for the kids – I find it fascinating too! lol. Pinned it!
I think so too! I love activities that are as exciting for me as they are for my wee ones! Thank you for pinning 🙂
my class is doing this experiment today.
Ooooh what a great experiment. I’ve struggled to explain this too.
Thanks for linking to The Sunday Showcase. I’ve pinned to our board.
Yes – The leaves changing can be tricky to explain! Hopefully this experiment helps it to make a bit of sense – and if your wee one is too young to grasp it, it makes for a cool magic trick all the same! Thank you for pinning
What an awesome investigation. I saw this experiment in several other posts with comments that it didn’t quite work. I think they didn’t “stew” the solution like you did. I asked my second grader about color change and got the lecture on chlorophyll back, but I know she will enjoy this experiment and seeing this color separation on her own. Thank you so much for sharing it – I will be featuring this post in the next edition of Afterschool! And, by the way, we just did a fun experiment of our own – http://learningwithmouse.blogspot.com/2013/09/mystery-substanceself-led-discovery.html
Thanks Natalie! Yes, I have done this experiment many times – worked every one! It is important to really mash the leaves and be patient. I hope it works well for you – please come back to let us know! I will definitely head over to check out your experiment – we are always up for Science ideas!
Thanks so much for sharing this great Science experiment over at After School!
My pleasure – thank you for hosting!
Very cool! I think my kids would love doing this project. Thanks for sharing at the After School Party
Thank you Kelly. Yes, I think it is a super cool experiment too – for grown ups as well 🙂
This is awesome! I’m adding this to my must-do list. My son would LOVE it! Thanks for sharing this at the After School Linky Party. I’m featuring it this week. Stop by tomorrow and share more of your phenomenal ideas!
What a compliment – thank you! I would love to stop by 🙂 Hope you enjoy with your son … Gotta love Science!!
Thank you so much for sharing this, Sarah! We went on a nature hike when the leaves were starting to change colour and I have been thinking that I needed to find something to explain to the kids why the leaves change colour. This is perfect!
I found your post through the Mom’s Library Link-up.
What a neat experiment! My daughter loves science so I will have to do this with her:) I am featuring you on my blog for the “Hearts for Home Blog Hop”. The link will be posted on Thursday:)
Thank you so much for the feature Erika! I love Science too.
Thanks my class of children are 2….they don’t understand but they LOVE my science experiments……and I have fun doing it with them
It’s really interesting that rubbing alcohol will make the colors in leaves separate. We will have to try that. I would love to have you visit and link up with my Entertaining and Educational Friday blog hop. – http://highhillhomeschool.blogspot.com
It is interesting Julie. Rubbing Alcohol breaks down the chlorophyll, imitating what happens in the cold weather. I find Science so fascinating too! I would love to link up to your blog hop on Friday – I will try to stop by this week! Thanks for the invite,
What a cool experiment! I am bookmarking this one for when the twins are a little older- they will love it (and so will I)! Thanks for linking up to Discover & Explore this week!
It really is cool. Glad you think so too! Thanks for having me over to link.
This is such an interesting experiment! I had no idea you could do that. I’m featuring you today in a collection of weather experiments for kids. Thanks for linking up to Discover & Explore!
Thanks Shaunna! Yes, it is a really neat experiment – I am eager to check out the others in your round up! Thank you for the feature 🙂
Wow! Can hardly wai to try!
Oh I hope you do give it a try Barb! It is one we do every year … very, very cool!
If I remember correctly, I think rubbing alcohol will also separate out the colors from a permanent marker (e.g. a Sharpie pen). Wonder if the color from chlorophyll is somehow similar? Might be amusing to do as a side by side experiment. 🙂
Fascinating – I don’t know about this one, but I certainly want to find out! Thank you for taking the time to mention it Gwen!
I came across your blog earlier this week because my oldest asked why leaves changed colors. So, we did this experiment. They had so much fun! We ended up using the colored alcohol as a form of watercolor paint. Well we tried to, it didn’t work very well haha.
So happy you found me here Chelsey! Glad your little ones liked the experiment. What a cool idea about the watercolour paint from the alcohol!
wow. i love this science project. next week we are doing leaves for the theme of the week. can’t wait to do this with the children. they are going to love it.
I bet you they will love it! And I am glad you sound so eager about it too – that will make them love it even more! It’s awesome – and so are you! Thank you for commenting!
Something went wrong with our experiment. We don’t have any color on our coffee filter. I stewed it like you said. Should we take the coffee filter out of our jar and let it dry?
Hmmm – rats! Sorry to hear! I don’t think taking it out and letting it dry will make a difference (however you might as well give it a try, perhaps you will e able to see a faint line) . Perhaps try again with more leaves, really really mashed. I promise it really does work! Sorry it didn’t for you – very disappointing!
Thanks for your help! I think there is a VERY faint line of yellow. It’s hard to tell. I probably didn’t mash it enough. That’s okay. It was a learning experience for my son to figure out what to do when something doesn’t turn out right.
Well I certainly love your positive attitude! I bet it will work for you next time – just mash like crazy!!!
Oh I love this so much! I can’t wait to try it with my little girls, thank you for posting! 🙂
So glad you are excited! Hope you and your little one have fun!
Hello. I would really like to do this experiment with some children, the only problem is that in my country we don’t have white coffe filtres. Can you recommend me something else to use instead?
Hi Myriam – great question. I am afraid I do not know of an alternate, but perhaps somebody else will – anyone?
It’s good
How about paper towels?
I’m not sure if this would work as effectively – but if you give it a try, please let me know!!
IF you know a a science teacher, (high school, college, middle school), you might be able to get lab filter paper, or the real deal, chromatography paper. If your alcohol isn’t dark green, let it sit on the leaves overnight, in the dark, and most all of the pigments will be extracted. Yellow are carotenoids, red would be anthocyanins. Which makes me wonder if you could grate carrots and see those pigments.
You should also play with purple cabbage juice. It’s a great pH indicator and you can test loads of household items: baking soda, lemon juice, soda… 🙂
Thanks for the suggestion! Very much appreciated!
We are doing this for my daughter’s 6th grade science fair project. We tried 3 different leaves from our yard. But only 1 gave us a faint yellowish line. I’m not sure if we didn’t mash it well enough. We tried it again using 2 different types of leaves and only one gave us good results. I don’t know if it’s the type of leaves we used. We live in Central Florida and don’t see leaves cancer by much. We will keep on trying till we get better results. It’s too late to change project ideas. ?
Oh No! I hope it works for you. A few tips would be to super, duper mash the leaves, leave the filter as long as possible in the mixture, and use really, really hot water. We are in Canada and get a whole plethora of colours in the Autumn. I am not sure if it makes a difference – I hope it works for you!
I’m not sure if the use of the metal lid to the canning jar made a difference but I did not get the results I expected. I plan to try again later tonight with plactic wrap. Any ideas for how to make the colors pop?
Have you tried this experiment with a leaf already changing color? If it’d work, it’d be neat to compare the filter strip of the green leaf to the changing leaf months later.
That’s a neat idea!
Thank you for sharing this simple science idea. To be honest I had forgotten why leaves turn color, so it was a nice little reminder and education for me as well. -makeitmindful
Glad you enjoyed it!
Just tried this and made some modifications that worked really well, so thought I would share. I let the leaves sit for several hours in the alcohol (about 4 hours). Then I poured the liquid into a clear glass cup and added an equal volume of water. It was cool to see what the liquid looked like in the clear cup (it was brightly pigmented at this point)! For the filter paper strips – after sitting for one hour there were some faint bands, but nothing impressive. I let the filter paper strips sit overnight, and WOW – there were vibrant bands in the morning! I tried hydrangea leaves (green – turn yellow in the fall), and red maple leaves. The red maple leaves were especially beautiful – there was a thick band of purple pigment at the top of the evaporation line and lower band of green pigment. Hope this is helpful! Thanks for posting this fun experiment!
Thank you so much for taking the time to add your modifications Abbi!
Why did you dilute the leaf-alcohol solution with water? Wouldn’t that dilute the pigments as well?
That is wonderful example for Extraction and color chromatography.Thank you very much.
So glad you liked the post – thank you for taking the time to let me know!
Instead of rubbing alcohol can I use spirit or nail polish remover.
I’m afraid I am not sure the answer to this question Sonali. Hopefully someone else will and will reply to your message. If you give it a try please let me know if it works. Thank you!
Tried this yesterday with 3 kindergarten classes. It didn’t really work, even hours later at the end of the day. I even tried mashing the leaves in a food processor. But then I checked today and there was faint colour lines!! Maybe because I used 50% rubbing alcohol? Anyway, cool experiment.
Oh Shucks! I have found that really, really mashing the leaves is key – but clearly you did that with the food processor. Maybe it was the lower concentration of alcohol. Sorry it didn’t work! That is so disappointing.
Does this experiment make the leaves themselves actually change color? Do the leaves turn yellow or red? Or just the paper gets color on it?
Hi Amanda, great question. It just makes the PAPER change colour.
Hey Sarah! I’ve done this experiment before and loved it. But this year my kiddos have taken us into a leaves and tree study now and all the leaves have already fallen off of trees. Will this experiment work with a dead leaf (one I get from the ground)?? Let me know. Thanks!
What an interesting question! I don’t believe it will work with a dead leaf, as the process is complete. But I could be incorrect!
What do you recommend I use if I don’t have coffee filters?
Hmmm … great question. I wonder if just paper towel would work? I am not sure! Perhaps someone else in this community will have insight!
The kids loved this experiment!! We got great results! Thanks for sharing!!!
So awesome!!!!! Thank you for sharing! xo